Now we know you’ve all heard of contouring, right, ladies? For the past two years or so, contouring has blown up to become one of the biggest beauty trends around. If you’ve tried it and enjoyed the magic it brings, you’ll know that it’s one of the best makeup techniques ever! However, when it comes to contouring, there is no one-size-fits-all technique. It must be done based on your facial shape. To help you out, we made a list of all the common facial shapes below, as well as how to contour each type perfectly!
How to Contour Your Face Shape to Perfection
In This Article:
The Basics of Contouring
Contouring and highlighting are skills you need to practice. Simply looking at a chart is a good start, but when it’s time to apply it to your face, you may find yourself a bit confused. These are the things to keep in mind before you start:
- Your highlighter should definitely be lighter than your skin tone. Ideally, it should be two shades lighter than your skin to really get that lifting effect.
- The highlighter must be applied to the areas of the face where light hits. Brush highlighter on the forehead, bridge of the nose, cupid’s bow, chin, inner corner of the eyes, and on the cheekbones (drawing a C to the temples).
- As for the bronzer, it must be two shades deeper than your skin if you will use your bronzer for contouring. Some people prefer to use matte contouring palettes and use bronzer for added glow later on.
- Contouring is used to define the face by working with the shadows. It is usually applied around the hairline (except the middle part of the forehead) and then under the cheekbones. You can also apply contouring powder on the sides of the nose to define the bridge.
- The secret to a perfectly contoured and highlighted face is blending.
Step 1: Get the Right Tools
Before starting, get a hold of these tools:
- Tape measure or ruler
- Pen and paper
- Mirror
Step 2: Measure Your Face
To be able to contour your face to perfection, you need to measure your face accurately. Here’s how:
- Measure your forehead across the widest part.
- Measure your cheekbones by placing the tape across the pointiest part.
- Measure your jawline from tip to chin to below your ear. Multiply the result by 2.
- Measure your face length from the center of your hairline to the tip of your chin.
Step 3: Know Your Face Shape
Now that you got your measurements down, compare and see which of these face shapes is yours.
- Oval – Face length is greater than the width of the cheekbones. The forehead is greater than the jawline. Cheekbones are the widest part.
- Square – All measurements are fairly equal. The angle of the jaw is sharp rather than rounded.
- Heart – Forehead measures greater than the cheekbones and jawline. Forehead and cheekbones are the widest part. Pointy chin.
- Round – Cheekbones and face length are equal. Forehead and jawline are equal. The angle of the jaw is soft and much less defined.
- Oblong – Face is noticeably longer than it is wide. Forehead, cheekbones, and jawline are similar in size. Chin has a rounded shape.
- Triangle (Inverted) – Jaw is the widest part of your face. Forehead and cheeks are both narrower.
How to Contour Your Face Based on Your Face Shape
Before proceeding, please make sure that you have identified your facial shape and have your tools with you. Are you ready? Find your face shape and start practicing.
1. Oval Face
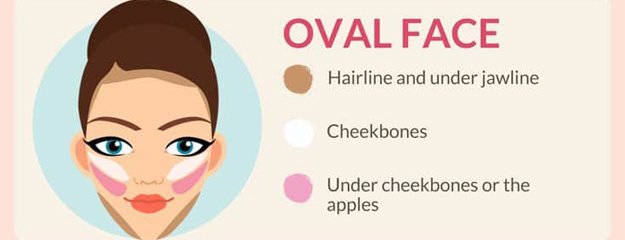
For this face shape, the focus is on setting the accents as you want the face to appear slimmer and more defined. You can use a contouring cream-based product and create contours on the side temples. You can find this between the eyebrows and the hairline. Apply the contouring cream on the upper part of the forehead as well.
Now go down to the jawline, just underneath the cheekbones, and apply a darker shade of contouring cream. Blend a bit closer to the mouth as this creates an illusion of a slimmer face. Blend properly using a contouring brush.
2. Round Face
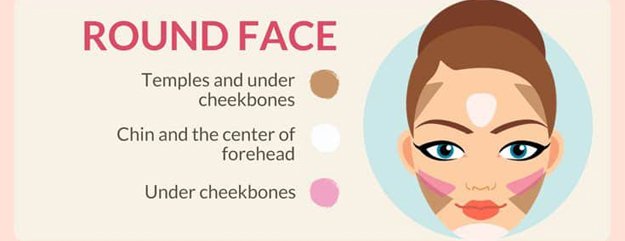
If you have a round face, the goal is to make it appear more oval, so you will have to do more work with the shading. This is how to contour a round face: Apply contour powder on the left and right temples and blend along the hairline. Do not blend the product on the center of the forehead because you want that space to add height to the roundness of the face.
Continue to contour the area under the cheekbones as well as the sides of the jawline. Doing this will make the face look more narrow. Blend properly with a contouring brush.
3. Square Face
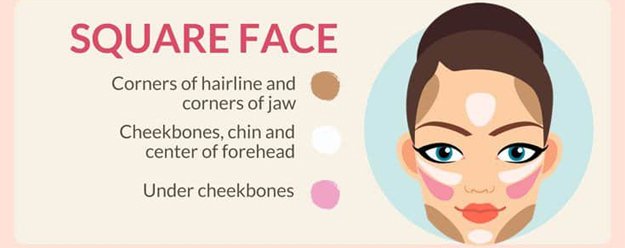
With a square-shaped face, the goal is to make it more oval as well. What you will need to focus on is softening the sharp areas of the face that make it look square. Apply your contouring product to the outer temples and under the cheekbones, but extend it from the ears to the corners of your mouth. For the jawline, you should only contour along the side of the jawbone.
Apply your contour product to the outer temples and under the cheekbones, but extend it from the ears to the corners of your mouth. For the jawline, you should only contour along the side of the jawbone.
Want to know a secret? I also use brown blush or darker-colored face powder for contouring!
4. Heart Face
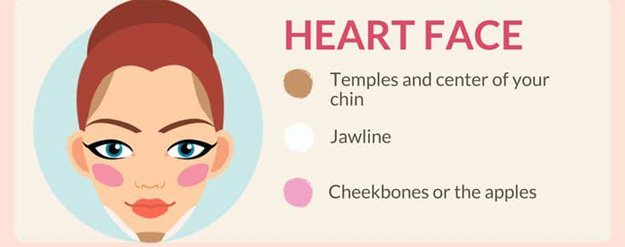
If you have a heart-shaped face, your aim is to make your forehead appear narrower as well as make your pointy chin appear rounder.
To contour this face shape, you have to apply contouring product on your outer and side temples. This will help narrow down the forehead. Move on to contouring underneath the cheekbones, starting from the ear and slowly tapering to the corners of the mouth. Finish off with contouring the pointy part of the chin.
5. Oblong or Long
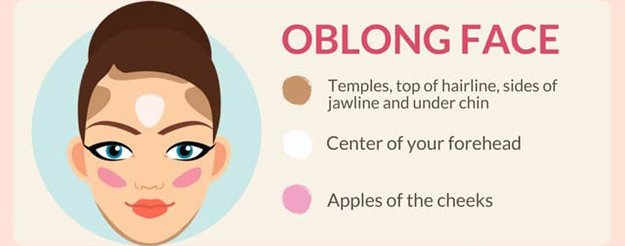
For women with an oblong face shape, you’d want to add some points to your rounded jawline, hairline, and chin. How to contour your face shape?
You must contour along the hairline to make it appear like your hairline is lower than it really is. And then you have to contour under the chin to make the face appear rounded. Remember, an oblong face tends to be on the longer side, so the aim is to make it look smaller. Also, contour below the cheekbones; you can start from the ears to the center of the cheeks.
6. Triangle Face
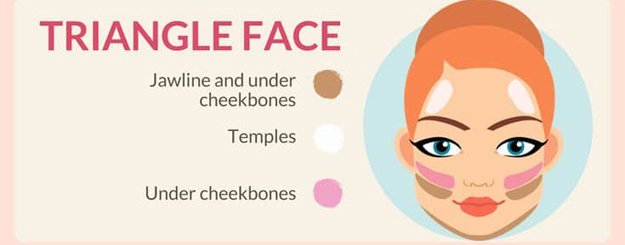
Some would say that the inverted triangle shape is similar to a heart shape. Well, that’s partially true, but the big difference is quite evident. Heart-shaped faces have a pointy chin, while inverted triangle faces have a wide jawline. So, how do you contour this face shape?
Again, you have to achieve balance. Since the jawline is wider, you have to make it appear narrow. Contour on the jawline and under the cheekbones. There’s no need to contour the temples as that will just make your forehead look smaller compared to the jaw again.
Bonus: Diamond Face

Same with the heart-shaped face, your aim is to make your forehead appear more narrow as this area is quite wide. So, apply contouring product on the sides of the forehead along the temples. This immediately makes your forehead look more narrow. Then, go down under the cheekbones and work your way from the ears to the center of the cheeks. After that, apply contouring product on the jawline but blend down in a curved direction. This will help the face look longer.

Need a good contour palette in your makeup stash? Check out Wildflower Liz’s recommendations here:
Contouring does make a huge difference when done correctly. It gives the face more depth and definition that will make you look 100% photo-ready all the time. It does take a bit of practice to perfect the craft, especially when it comes to blending. But as with anything, practice makes perfect! We hope you found this how to contour your face guide helpful, ladies!
How are your contouring experiences? We’d like to hear from you in the comments section below!
Up Next: How To Make Your Face Thinner With Makeup | Makeup Tutorials
Follow us on Facebook, Twitter, Instagram, and Pinterest for the latest makeup, hair and nail trends!
Editor’s Note – This post was originally published on September 22, 2017, and has been updated for quality and relevancy.
Leave a Reply