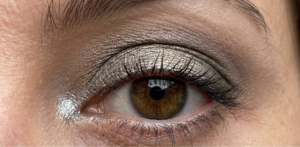
At a Glance: Makeup for Hooded Eyes
- Eyeshadow for hooded eyes has to be placed above the natural crease. The crease collapses and hides color the moment your eyes relax.
- Always apply and check shadow with your eyes open, not closed.
- Matte shadows belong in the fold zone. Shimmer in the crease amplifies the hood instead of lifting it.
- Thin eyeliner applied close to the lash line preserves lid space. Thick liner consumes it.
- Waterproof and long-wear formulas prevent transfer from the fold onto the skin above it.
- If your eye makeup creases within two hours despite correct placement, it's a formula problem, not a technique problem.
- The mirror check: if you can't see your crease color while looking straight ahead, it's placed too low.

Hooded eyes are a beautiful facial feature where natural folds partly conceal the lids. This unique trait may add depth and mystery to your gaze, but it can also make everyday makeup more challenging. Those with this eye shape notice their eye shadow fading or mascara smudging by midday. If these scenarios sound like part of your life, we’ve got the solutions you’ve been looking for. This guide shares seven steps and application tricks on makeup for hooded eyes to help you keep the shadow visible and create the lifted shape you’ve been chasing.
You've watched the tutorial twice. You followed every step. You opened your eyes and the eyeshadow was gone.
That's not a skill problem. It's a placement problem with a specific cause. Most eyeshadow tutorials are designed for eyes with a visible crease. If you have hooded eyes, that crease disappears the moment your lids relax, and any shadow placed inside it vanishes with it.
Eyeshadow for hooded eyes works on a different placement logic. You need to apply and check with your eyes open, and you need to know where your visible shadow zone sits before you touch a brush. This guide covers how to apply eyeshadow on hooded eyelids step by step: the placement rules, the formula rules that stop creasing, and the one diagnostic that changes how the whole process works.
What Makes Hooded Eyes Different
Hooded eyes have a fold of skin that covers part or all of the lid when your eyes are open and relaxed. The crease is still there anatomically, but it's hidden under the skin above it. Any shadow placed in the crease lands in a zone you simply can't see.
Two things cause hooding. Some people are born with it because the brow bone sits lower relative to the eye, creating a fold at any age. Others develop it over time as the skin around the eye loses elasticity and begins to drape over the lid. The techniques overlap, but the fold position and ceiling height differ between the two. The mature hooded eyes section below covers those adjustments specifically.
Quick self-check. You likely have hooded eyes if:
- Your crease isn't visible when you look straight into a mirror
- Eyeshadow vanishes when you open your eyes after applying it
- Eyeliner regularly transfers onto your upper lid by midday
If those first two apply, every technique in this guide is built for your eyes.
Hooded eyes are often confused with deep-set eyes. Deep-set eyes sit further back in the socket but still have a visible crease. Hooded eyes lose visible lid space because skin folds over it. Deep-set eyes can often follow standard crease placement. Hooded eyes can't. See our Deep Set Eyes Makeup guide for that approach.
Everyday Eye Makeup for Hooded Eyes: Product Picks
You don't need a large collection to make this technique work. For everyday eye makeup for hooded eyes, three products carry most of the load: a reliable matte palette, a transfer-resistant liner, and an eye primer that creates the dry base the fold zone requires.
Here's what I'd actually reach for, tested across extended wear and checked at the six-hour mark:
[AAWP BLOCK — Matte eyeshadow palette, drugstore, $15 to $25 range]
For eyeliner, the most important feature is a tip fine enough to stay close to the lash line without flooding the lid. A waterproof felt-tip formula holds the line without migrating through a full day.
[AAWP BLOCK — Waterproof felt-tip eyeliner]
Eye primer determines whether any of this holds. For the fold zone specifically, you want an oil-absorbing formula that sets dry. Hydrating or silicone-heavy primers create slip and contribute to creasing on active lids.
[AAWP BLOCK — Eye primer, oil-absorbing formula]
Simple Step-by-Step Technique
This step-by-step approach focuses on visibility when the eyes are open. Follow each step in order for the best results.
Step 1: Build a Matte Base That Won't Move

Before any shadow, cleanse the lid area to remove oil. Apply a thin, even layer of eyeshadow primer across the lid and 3 to 5mm above where your natural crease sits, covering the full zone you'll be working in. Blend it flat with your fingertip. Then lightly set it with a colorless translucent powder using a small fluffy brush.
Why this matters: The fold creates skin-on-skin contact that generates heat and friction throughout the day. Without a matte, set base, shadow will migrate, crease, and transfer onto the skin above the fold within a few hours regardless of how carefully it was placed. A dry, primed surface is what allows the placement technique to hold.
If you're using cream shadows anywhere in this look, set each one individually with powder before layering over it. Cream products applied over each other without a setting step are the most common reason hooded-eye looks fall apart by midday.
Step 2: Map Your Shadow Ceiling With Eyes Open

Pick up a matte transition shade, a soft neutral brown or taupe that's one to two shades deeper than your skin tone. Load a small fluffy brush and tap off the excess.
Open your eyes and look straight into the mirror. Don't tilt your head. Apply the transition shade lightly along the ceiling you identified in the diagnostic step, that zone sitting above where your natural crease hides. Use small back-and-forth motions, working the color upward and slightly outward toward the outer corner. Keep checking with your eyes open as you go.
Why this matters: Makeup must be placed based on how the eyes look open, not closed. This step ensures your shadow will stay visible.
Step 3: Build Depth Above the Fold

Switch to a deeper matte shade: a warm brown, soft plum, or cool taupe depending on the look you're going for. Load a smaller, more precise blending brush.
Working above the mapped transition zone, place the deeper shade at the outer third of the eye and blend upward and inward in soft, controlled arcs. Don't sweep the brush across your eye in one motion because that moves product down into the fold. Work in small upward strokes, then blend the edges with the clean side of your brush until there are no visible hard lines.
Check in the mirror with your eyes open before adding more product. The depth should read as shadow above the eye when it's open. If it's disappearing into the fold, it's placed too low. If it looks muddy, you've layered too heavily. Use a clean fluffy brush to diffuse rather than adding more shadow on top.
Why this matters: Gradual blending creates dimension without dragging the eye downward
Step 4: Place Lid Color on What's Actually Visible

Before you pick up a brush, open your eyes and look at your lid in the mirror. There's a strip of mobile lid below the fold. That's your working zone for lid color. It may be narrow, and that's fine. Precise application to a small area is more effective than flooding the whole lid.
Load a flat shader brush with your lid shade. Press the color onto that mobile strip rather than sweeping it. Sweeping pushes product up into the fold. Pressing keeps it where you placed it. Work from the center of the lid outward, then from the inner corner to the center.
If you're using a shimmer shade, this is where it belongs: concentrated on the mobile lid, not touching the fold zone. Shimmer on the fold catches texture and makes the hood more prominent. Shimmer on the mobile lid reflects light forward and makes the eye look more open.
Why this matters: Keeping lid color controlled prevents it from disappearing into the fold
Step 5: Apply the Thinnest Eyeliner That Still Shows

On hooded eyes, lid space is a limited resource. Every millimeter of thick liner covers lid you already have less of. The goal is a line that defines the lash line without consuming visible lid real estate.
Apply liner as close to the lash roots as possible, pressing it into the base of the lashes rather than drawing a visible line on top of the lid. Keep the line thin from inner corner to outer corner.
For a wing, angle it upward rather than straight out. An outward wing follows the natural angle of the eye and lies flat against the hood when your eyes are open. An upward-angled wing stays visible. Keep the base of the wing narrow, no wider than 1 to 2mm, and extend the tail no more than 3 to 4mm beyond the outer corner. Check the shape with your eyes open before it sets.
Waterproof gel liner or a fine-tip felt liner are the most transfer-resistant options for hooded lids. Pencil liners soften with body heat and migrate onto the upper hood by midday.
Why this matters: Thick liner reduces lid space. Thin liner enhances definition without overpowering the makeup.
Step 6: Light in the Right Places

A small highlight placed correctly can open a hooded eye more than any additional shadow work. Placed on the wrong zone, it does the opposite.
Press a light, reflective shade into the inner corner of the eye using a small flat brush or your fingertip. Soft pearl, champagne, or a pale matte cream all work here. This pulls the eye open at the center and counterbalances the depth you've built on the outer portion.
For the brow bone, apply a subtle matte highlight directly under the highest point of your brow arch, right underneath the brow itself. Keep it there and no lower. Applying highlight further down the brow bone, toward the lid, puts light on the fold and draws attention to the hood.
Skip chunky glitter or high-shimmer powders on the brow bone. They catch overhead light in a way that emphasizes draping. A finely-milled satin or matte shade gives the same lift without that effect.
Why this matters: Strategic brightness lifts the eye and balances the depth created earlier, making the makeup look more open.
Step 7: Lock It With Waterproof Formulas

Curl your lashes before applying mascara. On hooded eyes, curled lashes lift away from the lid rather than brushing against the lower hood skin, and that physical separation is what stops transfer at the lash line. Use a lash curler at the base of the lashes, hold for 10 seconds, then release.
Apply waterproof mascara in upward strokes on the upper lashes. Keep the lower lash line light. Heavy lower lash application adds visual weight that pulls the eye downward, which works against everything you've built above.
If you've used cream products anywhere in this look, a light setting spray held at arm's length and misted two to three times helps everything hold, particularly on humid days or for long-wear occasions.
Before you finish, step back from the mirror, open your eyes naturally, and look at the full result. Shadow should read as depth and definition above the eye. If any element has disappeared or transferred, that specific step needs a formula adjustment, not more product layered on top.
Why this matters: Hooded eyes experience more movement, so setting and waterproof formulas help makeup last longer without smudging.
The Best Eyeshadow Technique for Hooded Eyes: Quick Rules
If you remember nothing else from this guide, these five principles cover most of what goes wrong with eyeshadow on hooded lids.
Apply with your eyes open. Every placement decision should be checked in the mirror with your eyes relaxed and open. If shadow is invisible when your eyes are open, it was placed in the wrong zone.
Shadow goes above the crease. Your natural crease is hidden when your eyes are open. All depth, transition shade, and definition needs to land above it.
Matte in the fold, shimmer on the lid. Matte shadows recede visually and don't catch on texture. Keep shimmer on the mobile lid and inner corner only.
Thin liner preserves lid space. A fine line close to the lash roots defines the eye without reducing the lid area you're working with.
Blend upward. Outward blending follows the natural angle of the eye and drags the look down. Upward blending creates the lifted effect hooded eyes need.
What About Mature Hooded Eyes?
When hooding develops with age, a few things shift in the technique.
The fold tends to sit lower and may have more drape than anatomical hooding. The shadow ceiling needs to move higher to compensate, sometimes significantly higher than it would on a younger hooded eye. Use the open-eye mapping step carefully and don't carry over placement habits from earlier years.
Formula choices become more consequential on mature lids. Matte powder shadow in the fold zone is non-negotiable. Cream shadows without thorough powder setting will crease within hours. Avoid layering too many products; buildup reads as heaviness on mature skin rather than depth.
For liner, a soft brown or gray often performs better than a hard black on more mature lids. The line still needs to be thin and close to the lash line, but a softer pigment integrates into the look rather than cutting across it.
Keep the lower lash line minimal. A soft, diffused shadow on the outer third of the lower lash line adds subtle definition without the closing-down effect of a fully lined lower lid.
See our full Makeup for 40s guide and Makeup Tips for Mature Skin for the complete base and skin prep approach these techniques build on.
Final Touch
Eyeshadow for hooded eyes isn't complicated once you understand what you're working with. The fold hides the crease. Standard tutorials don't account for that. So you move the shadow above the fold, check everything with your eyes open, keep the fold zone matte, and keep your liner thin.
The one habit worth building first: start applying with your eyes open. That single change reorganizes where everything else lands, and it makes the placement logic feel intuitive faster than any other adjustment.
Related: Eyeshadow for Beginners | How to Apply Eyeliner | Best Eyeshadow Palette
FAQs
Can you wear eyeshadow with hooded eyes?
Yes. Hooded eyes can carry any eyeshadow look. The placement just works on a different zone than standard tutorials show. Shadow placed above the natural crease stays visible when your eyes are open.
Why does my eyeshadow disappear when I open my eyes?
Because it was placed inside the natural crease, which folds over and hides itself when the eye is open and relaxed. Moving the shadow above the crease, into the zone that stays visible, solves this.
What's the best eyeshadow technique for hooded eyes?
Map your shadow ceiling with your eyes open before applying anything. Work all depth and transition shade above the natural crease. Use matte shadows in the fold zone and shimmer only on the mobile lid and inner corner. Blend upward. Check every step in the mirror with your eyes open.
Should hooded eyes avoid shimmer completely?
No. Shimmer works well on the mobile lid and in the inner corner. It needs to stay out of the crease and fold zone, where it catches texture and makes the hood more visible.
How do I stop my eyeliner from transferring onto my hood?
Use a waterproof gel or felt-tip formula. Keep the line thin and close to the lash line. Setting the liner with a small amount of matching dark eyeshadow pressed gently on top adds a matte layer that absorbs the oil driving the transfer.
Does eyeshadow primer actually help with hooded eyes?
Significantly. The fold creates skin-on-skin friction and heat throughout the day. Without a primed, set base, shadow migrates out of placement within hours regardless of technique. An oil-absorbing primer set with translucent powder is the foundation the rest of the technique requires.
Is a winged liner possible on hooded eyes?
Yes, with two adjustments. Angle the wing upward rather than straight outward so it stays visible when your eyes are open. Keep the base of the wing very thin. A thick-base wing disappears into the fold. A fine upward flick stays visible.
Why did you choose that answer? Share your experience or routine in the comments so others can learn from what actually works.