Quick Summary: Cream Eyeshadow Stick for Beginners
- A cream eyeshadow stick for beginners applies directly from the product to your lid with no brush and no palette required
- Your ring finger is the correct blending tool. Its limited range of motion and warmth activates the cream eyeshadow stick formula better than any brush
- Creasing on hooded eyes when using a cream eyeshadow stick is usually a placement problem rather than a product problem, and applying with eyes open fixes most of it
- Four drugstore cream eyeshadow sticks under $10 deliver comparable results to prestige options at four times the price
This article contains affiliate links. If you purchase through our links, we may earn a small commission at no extra cost to you.
Every beginner makeup tutorial eventually asks you to pick up a blending brush, a transition brush, and a flat shader brush, then layer three to five eyeshadow shades in a sequence that only makes sense once you’ve been doing this for years. The result on anyone who hasn’t: something that looked effortless in the tutorial and looks like a mistake on your face.
A cream eyeshadow stick for beginners exists to remove all of that friction. One product, applied with your finger, done in under two minutes. The format works because cream formulas are forgiving in ways that loose powder is not. They blend where you press them and stay put once they set, without requiring a perfectly prepped lid to perform. The techniques here are written specifically for beginners and anyone who wants a fast, reliable eye look without learning a new skill. A few minutes on the placement and formula notes will prevent the two most common problems with any cream eyeshadow stick: cream that creases and color that disappears on hooded lids.
What Makes a Cream Eyeshadow Stick Different From Regular Eyeshadow
If you’ve ever tried powder eyeshadow and ended up with fallout on your cheeks and patchy color on your lid, a cream eyeshadow stick for beginners is the format that fixes both of those problems at once.
Powder eyeshadow sits on top of the lid and needs to be moved around with a brush. A cream eyeshadow stick presses into the lid surface, which means it goes where you put it and mostly stays there. That’s a significant advantage when you’re still figuring out placement.
The formula inside a cream eyeshadow stick is wax-based, which gives it a smooth glide on application and the ability to hold color without fallout. Pressed powder formulas are more forgiving over larger areas but require tools to move them. Cream eyeshadow sticks require nothing. The ring finger generates enough warmth to melt the formula slightly on contact, producing the blended, skin-like finish that makes a cream look work. This is why makeup artists reach for their fingers on cream products even when a full brush kit is in front of them. The finger is the correct tool, not the lazy one.
One thing worth knowing before you buy your first cream eyeshadow stick: these formulas have a set window of roughly 30 to 45 seconds after application. During that window you can blend freely. Once the formula locks in, blending becomes much harder and produces patchiness rather than a smoother finish. Work one eye at a time, blend immediately after each pass, and resist the urge to go back and adjust once the formula has set.
Shimmer vs. matte is worth a brief note when choosing a cream eyeshadow stick for beginners. Shimmer cream eyeshadow sticks catch light and create the appearance of a larger, more open eye. The shimmer particles themselves diffuse minor placement errors, making them more forgiving for first-time users. Matte cream eyeshadow sticks are flatter and more precise, which means they show placement errors more clearly. A neutral shimmer or satin finish stick is the lowest-risk starting point.
The Best Drugstore Cream Eyeshadow Sticks
The drugstore cream eyeshadow sticks below have been evaluated on formula behavior and documented wear, rather than appearance in the pan.
ColourPop Shadow Stix
The closest drugstore cream eyeshadow stick to a prestige-formula feel at this price. The mattes are rich and the metallics are high-impact without being glittery. The formula is creamy enough to blend easily but sets fast enough to stay put on most skin types. Documented wear on non-oily skin reaches 12 hours without primer. On oily lids, a primer underneath extends performance significantly. Best suited to normal-to-dry lids in neutral and metallic shades.

- Make Your Eyes Pop - Say hello to Shadow Stix! These super creamy eyeshadow sticks glide on smoothly for effortless application – just swipe...
- Why You'll Luv It - This shadow stick is perfect for beginners or pros. It’s easy to use, ultra-pigmented + long-lasting for high impact...
Last update on 2026-07-13 / Affiliate links / Images from Amazon Product Advertising API
(As an Amazon Associate, we earn from qualifying purchases.)
e.l.f. No Budge Shadow Stick
This cream eyeshadow stick formula sets faster than ColourPop and is the better choice for oily lids specifically. Pigment payoff on the first pass is slightly lighter, which is an advantage for beginners who want to build color gradually rather than commit to full intensity immediately. The shade range skews neutral, which works well for anyone new to cream eyeshadow sticks. Best suited to oily-to-combination lids.

- HIGH-PIGMENT METALLIC EYESHADOW: The e.l.f. No Budge Shadow Stick is a versatile cream eyeshadow stick that delivers high-pigment, metallic...
- CREAMY SMUDGE-PROOF FORMULA: The creamy, blendable formula glides on effortlessly as an eyeshadow or liner, won’t smear or crease, and gives...
Last update on 2026-07-13 / Affiliate links / Images from Amazon Product Advertising API
(As an Amazon Associate, we earn from qualifying purchases.)
NYX Jumbo Eye Pencil
One of the oldest cream eyeshadow stick formulas in this category and still among the most useful. The softer, creamier consistency blends longer than most sticks, giving beginners more time to adjust placement before it sets. That same softness means this cream eyeshadow stick doesn’t hold as long on oily lids without primer. The shade range includes finishes not available in the other options at this price. Best suited to dry-to-normal lids and anyone who needs a longer blend window.
- Eyeliner Crayon: This blendable radiant eyeliner pencil is a total triple threat; Use Jumbo Eyeshadow Pencil as a creamy eyeshadow, eye liner and...
- Smooth and Versatile: This creamy eye liner pencil glides on effortlessly, no pulling, tugging or fading; Apply it as an eyeshadow, highlighter...
Last update on 2026-07-13 / Affiliate links / Images from Amazon Product Advertising API
(As an Amazon Associate, we earn from qualifying purchases.)
Maybelline Color Tattoo
A pot format rather than a stick, but functionally identical in application: finger-applied cream formula with long wear. Once it sets, the formula is notably more budge-proof than any of the cream eyeshadow stick options above, making it the strongest performer for all-day wear. The blend window is shorter at roughly 20 seconds. Best suited to oily lids and anyone prioritizing maximum longevity.

- Shadow, Line and Prime: Meet our 1st all-in-one eyeshadow, eyeliner and eyeshadow primer. Color Tattoo Up To 24HR Wear Eye Stix brings easy...
- 10 Colorful Eye Shadow Sticks: Draw on bold, creamy, crease resistant color with ease. Our eyeshadows come with a precise built-in sharpener...
Last update on 2026-07-13 / Affiliate links / Images from Amazon Product Advertising API
(As an Amazon Associate, we earn from qualifying purchases.)
On the Merit dupe question: Community feedback consistently names the ColourPop Shadow Stix as the closest cream eyeshadow stick match to the Merit Solo Shadow in neutral matte shades, specifically in texture and blendability. Where that comparison gets more complicated is pigment depth. The Merit formula delivers more color in a single pass on fair and light skin tones. On deeper skin tones, the ColourPop and e.l.f. cream eyeshadow stick options deliver comparable depth at their price points. Shade performance across the full skin tone range has not been tested for every option in this guide, and that gap is worth naming directly rather than presenting the dupe claim as fully resolved.
How to Apply a Cream Eyeshadow Stick for Beginners in 6 Steps
These steps work for any eye shape. If you have hooded eyes, the placement note in Step 4 is the most important part of this entire guide. Read it before you start.
Step 1: Prep your lid
Before a cream eyeshadow stick touches your lid, the skin needs to be clean and fully dry. If you’ve just applied moisturizer, wait two to three minutes for it to absorb completely. Cream product applied over wet moisturizer has nothing to grip and slides straight into the crease.
If your lids are oily and you want a primer that actually extends wear without feeling heavy, the options below are the ones worth considering before you pick up your cream eyeshadow stick.

- MAXIMIZES PIGMENT & COLOR PAYOFF: Meet your eyeshadow's secret weapon for bold and vibrant color. Our Stay Put Eye Primer intensifies the pigment...
- UP TO 8 HOURS OF CREASE-PROOF WEAR: Say goodbye to smudging and fallout. This lightweight, long-wear shadow base creates a smooth, matte canvas...
Last update on 2026-07-13 / Affiliate links / Images from Amazon Product Advertising API
(As an Amazon Associate, we earn from qualifying purchases.)
If your lids are normal to dry, you can skip primer and apply the cream eyeshadow stick directly to bare skin.
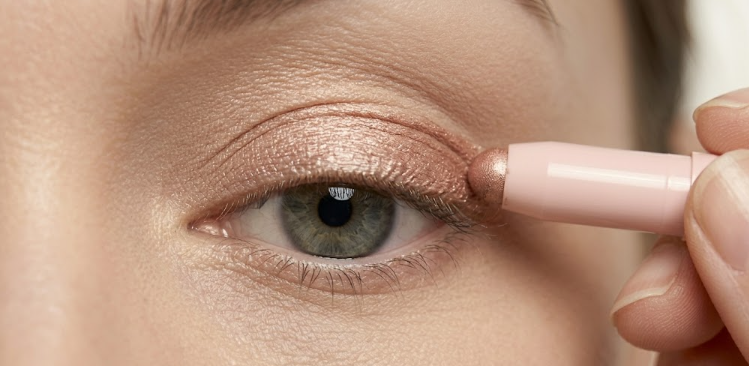
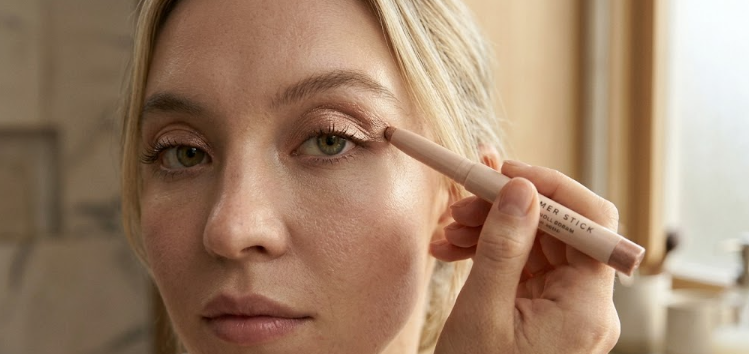
Step 2: Swipe the cream eyeshadow stick onto the center of your lid
Twist up the product slightly. Less product than you think you need is the right amount. Place the tip of the cream eyeshadow stick at the center of your lid directly above your pupil and swipe once toward the outer corner, then once toward the inner corner.
Working outward from center gives you even coverage without loading either corner before you’ve had a chance to blend.

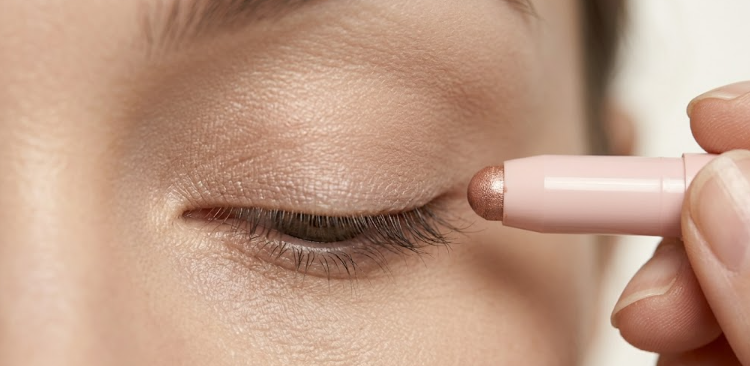
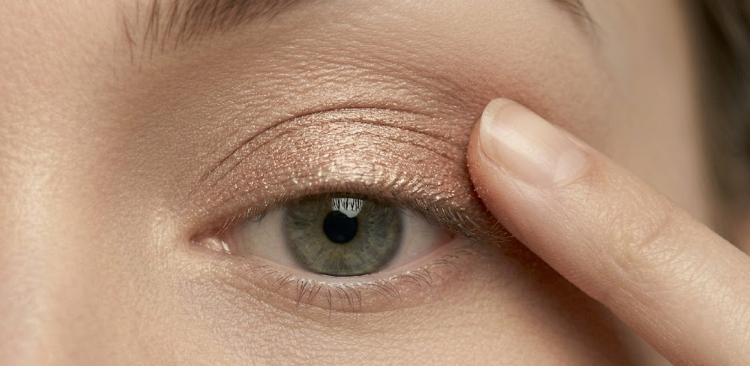
Step 3: Press and blend with your ring finger
Immediately after swiping the cream eyeshadow stick, use the pad of your ring finger to press the color into the lid. Press rather than drag. Dragging pulls the product off the lid and distributes it unevenly. Once the color is pressed in, use small circular motions working outward from center to blend the edges.
The heat from your finger activates the cream eyeshadow stick formula and creates a seamless finish. This takes about 20 seconds per eye.
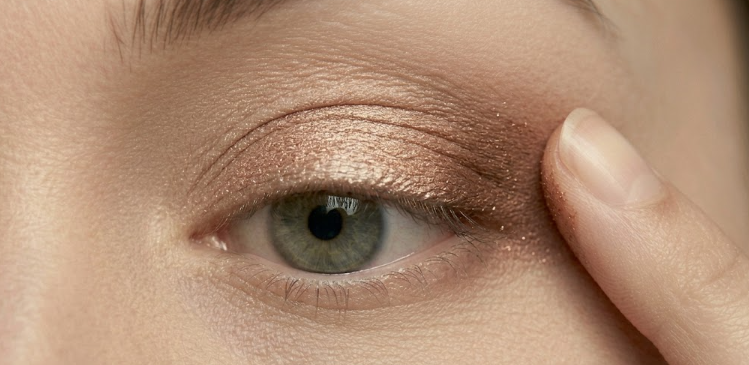
Step 4: Blend the upper edge upward with your eyes open
After blending the cream eyeshadow stick across the lid, use the tip of your ring finger to soften the upper edge of the color by pressing it upward toward the brow bone. Do this with your eye open. Looking straight ahead in a mirror while you blend lets you see the actual visible lid zone, which is the area that shows once your eye is open and the hood covers the crease.
On hooded lids, the visible zone is narrower than it looks on a closed eye. Color placed only in the crease will be hidden once the eye opens. Color from a cream eyeshadow stick blended slightly above the natural crease will show. This single adjustment accounts for most of the difference between an eye look that reads as intentional and one that disappears entirely on hooded eyes.
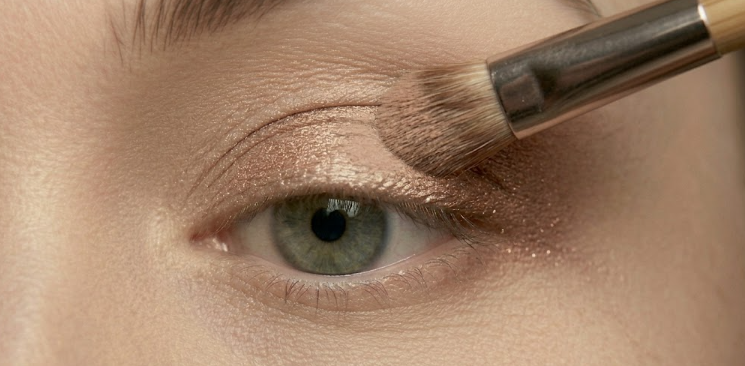
Step 5: Add depth to the outer third (optional)
For a more defined look with your cream eyeshadow stick, apply a second pass to the outer third of your lid only, from the outer corner inward to roughly the center. Press and blend the same way, this time blending inward so the color fades toward the center of the lid.
This creates a subtle gradient effect with a single product.
Step 6: Set if your lids are oily
If you’ve applied the cream eyeshadow stick without primer and your lids tend toward oil, a single light press of translucent powder over the finished eye extends wear by locking the cream formula in place. Use translucent rather than a colored setting powder, because any pigment will shift the tone of the cream eyeshadow stick underneath. One press is enough.
Layering powder over cream is what causes the chalky, cakey finish most people are trying to avoid, so apply minimally.
Does a Cream Eyeshadow Stick Crease on Hooded Eyes? (And What to Do About It)
Beginners ask this question more than almost any other about cream eyeshadow sticks, and the honest answer is that “creasing” is actually two different problems that look similar but need completely different fixes. Treating them the same way is why most attempts to solve it don’t work.
The First Problem: Actual Creasing
This is what happens when the cream eyeshadow stick formula folds into the natural lid crease and leaves a harsh, visible line. The cause is formula-skin interaction, not technique. On oily lids, the wax in a cream eyeshadow stick keeps the formula soft and movable long enough for skin oils to push it into the crease before it can lock in.
Two fixes work here. The first is an eye primer applied before the cream eyeshadow stick, which gives the formula something to grip so it sets rather than slides. The second is switching to a faster-setting formula. Look for cream eyeshadow sticks that describe themselves as water-activated, or check that silica appears in the first five ingredients. Both indicators mean the formula is engineered to grip and set quickly rather than stay creamy on the lid. The ColourPop Shadow Stix and Milani Gilded Eyeshadow Sticks both perform better on oily lids than most wax-heavy competitors at the same price.
The Second Problem: Color That Vanishes On Open Eyes
This one gets mislabeled as creasing constantly, and primer won’t touch it. When the hood of the eye folds down over the lid, it covers the crease and everything below it. Color placed in the crease, which is where most tutorials tell you to put it, simply disappears once the eye is open. The product is still there. It’s just hidden.
The Sephora Beauty Insider Community’s Everything Eyes thread described the fix clearly:
“apply your eye makeup with eyes open and place a deeper shadow in a sideways V shape right above your natural crease.”
With a cream eyeshadow stick specifically, the sideways-V works by angling the second pass from the outer corner upward toward the end of the brow, then back down toward the center of the lid. Blend by pressing upward with the ring finger, eyes open throughout. The full technique is in Step 4 above.
The result is color that sits in the visible zone of the lid regardless of how pronounced the hood is.
Why Your Cream Eyeshadow Stick Creases: The Actual Fix
Most cream eyeshadow stick problems trace back to one of four specific mistakes, none of which require a new product to resolve.
- Applying too much product in a single pass is the most common. A thick layer of cream eyeshadow stick formula takes longer to set and folds into the crease before it locks in. One thin pass, fully blended before adding more, is the correct sequence. The formula is buildable, so a second layer is always an option once the first has set.
- Using the wrong finger matters more than most people expect when applying a cream eyeshadow stick. The index and middle fingers apply too much downward pressure and drag the formula rather than pressing it in. The ring finger has a naturally smaller range of motion that produces the pressing-and-patting action the cream eyeshadow stick formula needs. Switching fingers changes the result on the same product.
- Applying on a closed lid and skipping the placement check is what causes most of the invisible-eye-look frustration on hooded eyes. Applying the cream eyeshadow stick with eyes open and checking in the mirror after each step takes an extra 15 seconds and prevents the most common beginner outcome: color that blends beautifully on a closed lid and disappears entirely once the eye opens.
- Applying a cream eyeshadow stick over moisturizer that hasn’t fully absorbed creates a slip layer between the formula and the skin. Cream product on wet moisturizer moves freely and settles into every line and fold before it can lock in. Waiting two minutes after moisturizer costs nothing and changes the outcome. This is a formula-compatibility issue rather than a technique problem, and blending skill alone cannot compensate for an unstable base.
How to Get Three Different Looks From One Cream Eyeshadow Stick
One cream eyeshadow stick produces meaningfully different results depending solely on how much product you apply and where you place it.
- The all-over wash uses a single pass from inner to outer corner, pressed across the full lid with the ring finger and blended upward at the edge. The result reads as polished without reading as “eyeshadow,” the kind of finish that looks like your eyes are just having a good day.
- The defined lid applies the cream eyeshadow stick only from the lash line to just above the crease, kept in the visible lid zone with the upper edge blended and no product over the brow bone. More definition than the all-over wash, still a single product.
- The soft smoky layers a second pass on the outer third only, blended inward so the color fades toward the center. The gradient develops within a single shade because the outer corner carries more product buildup than the center. No second product needed.

Final Look
A correctly placed $7 cream eyeshadow stick outperforms a misused $70 palette. The technique matters more than the price, and the technique for applying a cream eyeshadow stick for beginners is genuinely simple. If your lids run oily, the e.l.f. No Budge Stick is where we’d start: faster set time and reliable wear without primer for most skin types. If your lids are dry or normal, the ColourPop Shadow Stix gives the richest payoff at the lowest price. Choose one neutral shade, apply it using Steps 3 and 4, and see what it does on your specific eye before adding anything else to the routine.
FAQ
Can you use a cream eyeshadow stick as eyeliner?
Yes. Twist the product up to expose a small amount and apply along the upper lash line using the tip of the stick. Softer formulas like the NYX Jumbo and ColourPop Shadow Stix smudge easily for a smoky liner effect. Faster-setting formulas like the e.l.f. No Budge and Maybelline Color Tattoo hold a cleaner line. Clean up edges with a cotton swab immediately after application, before the formula sets.
How long does cream eyeshadow last without primer?
On normal-to-dry skin, documented wear ranges from eight to twelve hours depending on the formula. On oily skin, expect three to five hours before the formula migrates. Eye primer is the single highest-impact addition for extending cream eyeshadow longevity, more so than any setting powder, and typically adds two to four hours of wear across all skin types.
What’s the best drugstore dupe for Merit Solo Shadow?
ColourPop Shadow Stix is the closest match in texture and blendability for neutral matte shades. On fair and light skin tones, the Merit formula has a higher pigment payoff per pass. On deeper skin tones, the ColourPop delivers comparable depth at a fraction of the price. The dupe claim holds for texture and application experience. Pigment depth on very fair skin is the one variable where the prestige option has an edge.
Is cream eyeshadow good for mature or hooded eyes?
Cream eyeshadow generally performs better on mature eyes than powder does, because the formula sits on top of skin rather than settling into fine lines the way loose powder can. The key adjustment for mature eyes mirrors the hooded-eye adjustment: apply with eyes open and keep the color in the visible lid zone rather than the natural crease. On very crepey skin that has lost elasticity, applying a primer first prevents the formula from emphasizing texture.
The Great Brush Debate
Why did you vote that way? Drop your take below.