Quick Answer: Eyeliner For Hooded Eyes
- Hooded eyes have a fold of skin that sits over the mobile lid when eyes are open, which is why standard liner placement disappears or transfers
- The most important rule for eyeliner for hooded eyes: always apply with your eyes open, never closed
- Thin liner preserves the visible lid zone; thick liner fills it and makes eyes look smaller
- Waterproof gel and liquid formulas are the baseline for eyeliner for hooded eyes, not an upgrade
- Tightlining (pressing liner into the lash roots) creates definition without needing visible lid space
- An eyeshadow primer applied before liner is what keeps placement in place all day
If you’ve ever drawn what looked like a perfect liner line, opened your eyes, and watched it vanish into a fold of skin, you’re not doing it wrong. You’re doing it with instructions that were written for a different eye shape.
Eyeliner for hooded eyes doesn’t fail because hooded eyes are difficult. It fails because most tutorials assume a flat, visible lid surface that hooded eyes don’t have. The fold that sits over the mobile lid when your eyes are open changes where liner needs to go, how thin it needs to be, and which formulas can actually survive the day. Once you understand those three things, liner stops disappearing.
This article covers all of it: placement, formula, the wing problem, and the specific techniques that work for eyeliner for hooded eyes. Whether you’re starting from scratch or have been fighting your liner for years, what’s here is built for this eye shape specifically.
What Are Hooded Eyes (And Why Does Your Eyeliner Keep Disappearing?)
Hooded eyes have a fold of skin that droops over the natural crease and covers part or all of the mobile lid when your eyes are fully open. Some people are born with them. Others develop the fold gradually with age as skin loses elasticity. Either way, the anatomy is the same: the surface you apply liner to when your eyes are closed is not the surface that’s visible once your eyes open.
That’s the core problem with eyeliner for hooded eyes. When you draw liner on a closed lid, you’re placing product inside the fold. The moment your eyes open, the hood comes down and either hides the liner entirely or presses it against the skin above the lid. That’s where the shadow transfer comes from, and that’s why your liner looks smudged by mid-morning even when you’ve set it carefully.
The fold also creates a friction zone at the outer corner. Skin touches skin there with every blink. Even a high-quality waterproof formula will degrade faster in that zone than it would on a flat lid, which is why the outer corner is where eyeliner for hooded eyes tends to disappear first.
None of this is unfixable. It just requires a different starting point than the tutorials you’ve been watching.
The One Rule That Changes Everything
Every placement decision you make for eyeliner for hooded eyes needs to happen with your eyes open and looking straight ahead into the mirror.
That’s the rule. Most of the other techniques in this article build on it, but if you only change one thing, change this.
When you close your eye to apply liner, you’re working on a smooth, flat surface. It feels easier to draw on. The line looks clean and correctly placed. Then you open your eye, the fold comes down, and the line shifts, compresses, or disappears into the crease. What looked precise on a closed lid is cut in half on an open one.
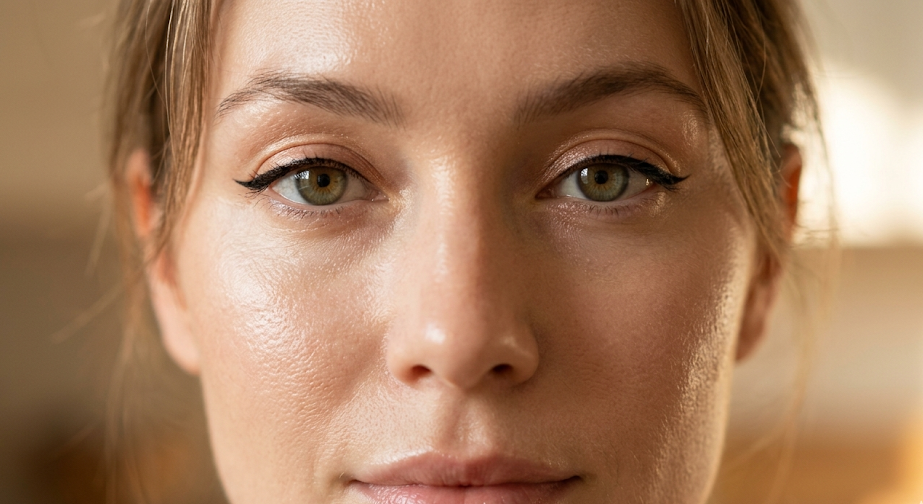
Applying with your eyes open forces you to place liner in the zone that’s actually visible when you’re out in the world. It also reveals something important: the visible zone on hooded eyes is narrower than most tutorials account for. That’s useful information. It tells you immediately how thin your liner needs to be and how high your wing needs to angle to clear the fold.
If you’re applying a wing, there’s one additional step that makes this easier. Draw the wing tip first, before you draw anything on the lid. Place that anchor point at the outer corner, angling upward toward the tail of your brow. Then close your eye and connect the lid line to that tip. You’ll notice that closing your eye creates a gap in the liner shape, because the skin folds. That gap is intentional. Fill it in, and when you open your eye, the wing will sit correctly. If you draw a straight line with your eye closed, the fold will break it.
Before you try any of the techniques below, this is the one product that makes all of them work longer:
No products found.
(As an Amazon Associate, we earn from qualifying purchases.)
If you want a full picture of how hooded eyes affect every part of your eye makeup routine beyond liner, our complete guide to makeup for hooded eyes covers eyeshadow placement, base prep, and the full technique stack from start to finish.
How to Apply Eyeliner for Hooded Eyes: 7 Easy Techniques
These techniques are ordered from simplest to most advanced. You don’t need all seven. Start with the one that matches what you’re trying to achieve, practice it until it’s consistent, and add from there if you want to.
1. Tightlining
Tightlining means pressing liner directly into the lash roots rather than drawing a line on the lid surface. There’s no visible line when it’s done correctly. What you see instead is a denser, darker lash base that makes eyes look more defined without using any of the visible lid space.
This works especially well when your hood is pronounced enough that even a thin liner line disappears. It also works well as a base under other techniques for eyeliner for hooded eyes, because it fills the gap between lashes that’s visible at close range.
To tightline, use a waterproof kohl pencil or a fine-tipped gel liner. Look straight ahead into the mirror, then angle your gaze slightly downward without tilting your chin. Press the product into the very base of your upper lashes, working from the inner corner outward in small sections. You don’t need to draw a continuous line. Press, lift, move, press again.
The result won’t look like liner when you check the mirror. It’ll look like your lashes grew in denser at the root. That’s what you’re going for.
2. Thin Upper Lash Line
This is eyeliner for hooded eyes in its most stripped-back form: a hairline stroke along the upper lash base, applied with eyes open, kept as thin as the product allows.
The thin line works because it adds definition without filling the narrow visible zone that hooded lids have. A line that’s 1mm wide reads as clean and defined. A line that’s 3mm wide starts to consume the lid and close the eye down visually.
Use a fine-tipped liquid liner or a felt-tip pen for this technique. Start from the inner corner and work outward in short strokes, keeping the tip as close to the lash line as possible. Don’t pull the skin taut. Let your eyes stay in their natural position and work with what’s visible.
Check your work with your eyes fully open before it dries. If the line is sitting inside the fold, it’s placed too low. Move it up slightly until it sits just above where the fold comes down.
3. Outer-Half Liner Only
If full-length liner for hooded eyes keeps disappearing at the inner corner or weighing the eye down, restricting liner to the outer half of the lid is a practical fix. The outer half is where definition does the most visual work on hooded eyes, and it’s where the fold tends to be least pronounced.
Apply liner from the center of the lash line outward, keeping the line thin at the center and slightly more present toward the outer corner where there’s more room. Stop at the outer corner or extend into a small upward flick.
This reads as polished at conversational distance and is significantly more forgiving to apply than full-length liner because you’re working with the widest and most stable part of the lid.
4. Upward-Angled Wing
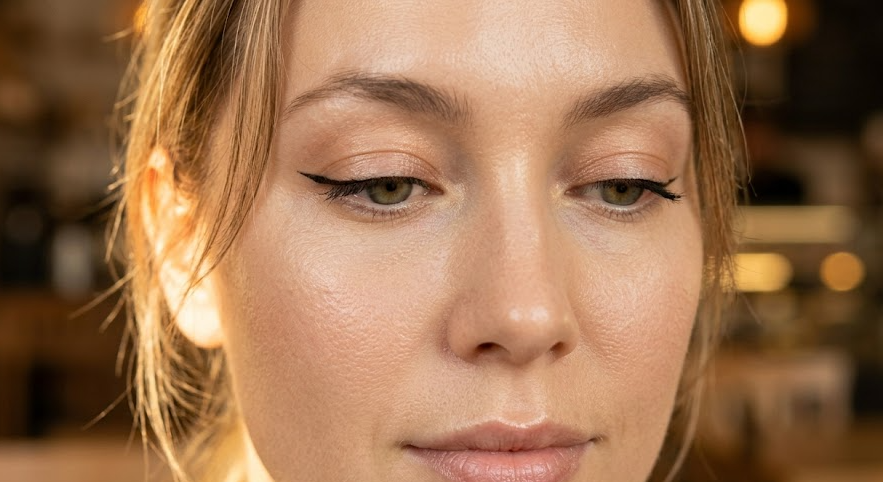
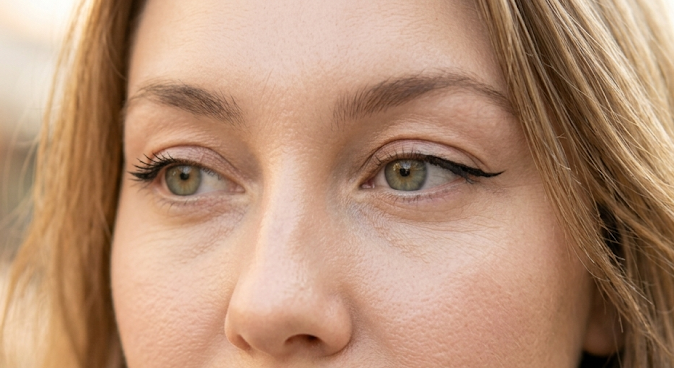
A horizontal wing on hooded eyes gets swallowed at the outer corner. The fold comes down and covers it. An upward-angled wing, aimed toward the tail of the brow, clears the fold and stays visible. Getting eyeliner for hooded eyes to wing correctly is almost entirely about this angle.
Start by marking your wing tip first. With eyes open, place a small dot or dash at the outer corner, angling upward at roughly 30 to 45 degrees toward your brow tail. Use the lower lash line as your directional guide: extend it upward and outward as if it were continuing past the corner. That’s where your tip belongs.
Once the tip is placed, draw the upper edge of the wing from that tip down toward the outer lash line. Then draw a thin liner line from the inner lash corner outward to meet it. Fill in any gaps. The shape will look angular and slightly unusual with your eyes open. That’s correct. It’s compensating for the fold.
5. C-Shape Wing Construction
This technique is for eyes where the fold is pronounced enough that even an upward-angled wing gets partially covered at the outer corner. It creates a wing that accounts for how the skin moves when the eye opens, and it’s one of the most useful methods for eyeliner for hooded eyes when the hood is significant.
Draw your wing tip with eyes open, angled upward. Then close your eye and connect the lid line to that tip. You’ll see a gap form in the liner shape where the skin folds. That gap is correct and expected. Fill it in completely. When you open your eye, the fold will compress that filled section and the wing will appear continuous and correctly placed.
If you draw a straight line from tip to lid with your eye closed, you’ll get a wing that breaks apart when your eye opens. The C-shape accounts for the skin movement that closing and opening your eye creates.
This takes practice. Expect to wipe and redo it a few times before the shape makes sense. It will.
6. Lower Lash Line Only
When upper lid transfer is unavoidable regardless of formula or primer, shifting eyeliner for hooded eyes entirely to the lower lash line is a practical alternative that still creates real definition.
Apply liner to the outer third of the lower lash line, smudging slightly downward and outward. This draws attention to the lower lash area and creates a defined eye look without any contact with the hood. It won’t transfer to the upper lid because it’s not on the upper lid.
For oily lower lids, set liner immediately with a matching eyeshadow pressed over it. This absorbs the liner into the shadow and slows degradation significantly.
7. Smudged Liner
Smudged liner is the most forgiving technique for eyeliner for hooded eyes because it doesn’t require a precise line. It works by using a pencil liner at the lash base, then pressing a matching or darker eyeshadow over it with a small flat brush to blur and set it simultaneously.
The shadow set step does two things. It locks the pencil formula so it doesn’t migrate, and it softens the line into a diffused definition that reads well on hooded eyes at any distance.
Apply pencil liner close to the lash roots, slightly thicker than you’d normally go. Then immediately press shadow over it and work the brush upward slightly to blend. What’s left is a smoked-out definition that doesn’t require a precise lash line and survives the fold’s friction zone better than unset pencil.
This is also the technique that most closely mimics the look of a high-end liner with a drugstore pencil. Pigment payoff in the pencil matters less when shadow is doing the setting and intensifying work.
Best Eyeliner for Hooded Eyes: Formulas That Actually Hold
Placement technique determines where eyeliner for hooded eyes goes. Formula determines whether it’s still there at 3pm.
On hooded eyes, the fold creates constant skin-to-skin contact at the outer corner and across the lid with every blink. That contact degrades liner faster than it would on a flat lid. Choosing a formula that can handle that friction isn’t a preference. It’s the practical requirement for this anatomy.
- Liquid liner dries to a hard film that resists smudging well. It’s the most transfer-resistant of the available formula types and the hardest to correct once it sets. It works best for the thin lash line, outer-half, and wing techniques where you want a defined edge that holds. Beginners should expect a learning curve before the application stays consistent.
- Gel liner is the most flexible option for eyeliner for hooded eyes. It applies smoothly, gives you a few seconds to adjust placement before it sets, and once dry it holds well against fold friction. Gel also works for tightlining, which liquid formulas don’t accommodate easily. If you’re choosing one formula to start with, gel is the most practical choice for most hooded eye types.
- Pencil liner has the creamiest application and the highest transfer risk. On oily lids or pronounced hoods, unset pencil liner will migrate within 60 to 90 minutes. That doesn’t make it useless. It makes it a formula that requires the smudge-and-set step to perform reliably. Pencil paired with shadow pressed over it is a legitimate and effective approach. Pencil alone on hooded oily lids is not.
- Felt-tip liner pens sit between liquid and gel in terms of flexibility. The tip gives you control similar to liquid liner, but the formula is usually slightly more forgiving on the correction window. They work well for the thin lash line and outer-half techniques.
Before any of these, primer. An eyeshadow primer or concealer applied to the lid and allowed to set for 60 seconds changes the surface the liner is sitting on. It reduces oil migration, smooths texture, and gives the formula a grip layer it wouldn’t otherwise have. Skipping primer and buying a better liner is solving the wrong problem.
These are the formulas that hold up consistently when used with the placement techniques above, with wear tested at the 4-hour and 8-hour marks.

Last update on 2026-07-13 / Affiliate links / Images from Amazon Product Advertising API
The Wing Problem: Why Eyeliner for Hooded Eyes Keeps Disappearing at the Corner
The winged liner failure on hooded eyes has a specific cause. The fold at the outer corner sits lower than the wing needs to live. A wing drawn at or below the fold line gets compressed against the upper lid skin the moment the eye opens. At conversational distance, it either disappears or reads as a smear.
The fix isn’t a steadier hand or a better formula. It’s a different angle.
The wing tip for eyeliner for hooded eyes needs to sit above where the fold comes down, not at the lash corner itself. Look straight ahead in the mirror and observe where the fold ends at the outer corner. Your wing tip belongs just above that line, angled upward toward your brow tail. If the tip is below the fold line, it’ll be invisible when your eyes are open.
Two errors show up consistently when hooded eye wearers struggle with wings. First, drawing a horizontal wing instead of an upward one. A horizontal wing angles outward along the direction of the lower lash line and stays level. On hooded eyes, the fold covers the outer corner and horizontal wings disappear under it. An upward wing clears the fold.
Second, making the wing too short. On hooded eyes, a short wing sits entirely inside the fold zone. A slightly longer wing with an upward angle has a better chance of clearing the fold and staying visible. It doesn’t need to be dramatic. It needs to be long enough and angled enough to read above the hood.
Common Mistakes With Eyeliner for Hooded Eyes
Applying with eyes closed. This is the most consistent error across every community discussion of eyeliner for hooded eyes. Liner placed on a closed lid lands inside the fold when the eye opens. Technique and formula become irrelevant if placement is mapped to the wrong surface.
Drawing liner too thick. Hooded eyes have a narrow visible zone. A thick line uses most of it and leaves the eye looking heavy and closed rather than defined. Keep eyeliner for hooded eyes as thin as possible and build up only where the fold gives you room.
Skipping primer. The fold creates a warm, often oily friction zone that degrades liner faster than it would on a flat lid. Without a primer layer, even waterproof formulas show transfer or migration by midday.
Using pencil liner without setting it. Pencil liner is creamy and workable, but it’s also the most transfer-prone formula available. On hooded lids, unset pencil migrates to the upper skin fold within an hour or two. Set it immediately with a matching eyeshadow pressed directly over it.
Placing the wing at the wrong angle. A horizontal wing on hooded eyes sits directly in the fold zone. An upward wing that angles toward the brow tail clears the fold. If your wings keep disappearing when you use eyeliner for hooded eyes, the angle is the variable to adjust before the formula.
Checking only in a close-up mirror. A close mirror with your eye slightly relaxed shows more lid than the world actually sees. Always do a final check at a natural distance with your eyes fully open before leaving the house.

Conclusion
If eyeliner for hooded eyes has felt like a guessing game, that’s a technique problem, not an eye problem. The tutorials that didn’t work weren’t wrong because of your anatomy. They were built for a different anatomy and nobody told you that upfront.
The three decisions that determine outcome are: where you place eyeliner relative to the fold, which formula you choose based on your lid type, and whether you’ve primed the surface first. Get those right and the specific technique matters a lot less than you’d expect.
Tightlining, thin liner, a proper wing angle — any of these can work once the surface is prepped and the placement zone is correct. Start with one technique, practice it until it’s consistent, and adjust from there. The learning curve on eyeliner for hooded eyes is real, but it’s shorter than most people expect once they’re working with the right information.
FAQ
How do you do eyeliner on hooded eyes for beginners?
Start with a waterproof gel liner and an eyeshadow primer. Apply primer to the lid and let it set for 60 seconds. Then, looking straight ahead in the mirror with your eyes open, press a thin line of gel liner along the upper lash base. Keep it thin. Check how it looks with your eyes fully open before it sets. That’s the foundation the other techniques build on.
What type of eyeliner is best for hooded eyes?
Waterproof gel liner is the most reliable starting point for eyeliner for hooded eyes. It applies smoothly, gives you a short window to adjust placement, and holds well against the fold’s friction once it’s dry. Waterproof liquid liner is more transfer-resistant but less forgiving on corrections. Pencil liner works when it’s set immediately with eyeshadow pressed over it.
Why does my eyeliner transfer to my upper lid?
The fold of skin on hooded eyes presses against the liner when your eye opens, picking up product and depositing it on the skin above the lid. The fix is a combination of primer applied before liner, a waterproof or gel formula, and placement above the fold rather than inside it.
Can you do a winged liner with hooded eyes?
Yes, but the wing needs to angle upward toward the brow tail rather than extending horizontally. A horizontal wing sits inside the fold and disappears when eyes are open. An upward wing clears the fold and stays visible. Place the wing tip first with eyes open, then connect the line to it.
Does tightlining work on hooded eyes?
It’s one of the most reliable techniques for eyeliner for hooded eyes. Pressing liner into the lash roots creates definition without needing visible lid space, which makes it practical for eyes where the fold is pronounced enough to cover even a thin liner line.
How do I stop my eyeliner from smudging on hooded eyes?
Prime the lid before liner, choose a waterproof gel or liquid formula, apply with eyes open, and allow full dry time before opening your eyes completely. If smudging persists at the outer corner, set liner in that zone with a matching eyeshadow pressed directly over it.
POLL: The Hooded Eye Liner Debate
Why did you vote that way? Drop your take below.