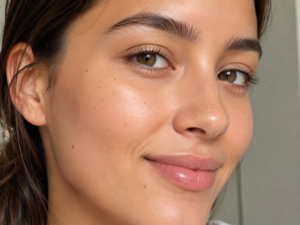
Quick Answer: Eyeshadow Tutorial for Deep Set Eyes
- Deep set eyes sit further back in the socket, creating natural shadow on the lid before any makeup is applied.
- Standard crease placement pushes the eye further back. For this shape, the working crease sits higher, in the natural shadow zone below the brow bone.
- Light, brightening shades go on the lid. Depth goes at the outer corner and the brow bone transition zone.
- Pressed matte formulas stay in place under socket compression. Loose shimmers and high-slip cream shadows migrate and worsen the recessed look.
- Shadow placement should always be checked with eyes fully open, looking straight forward.
This post contains affiliate links. If you purchase through our links, we may earn a commission at no extra cost to you.
When you follow a standard eyeshadow tutorial and end up looking like your eyes are disappearing into your face, that’s not a skill problem. It’s a placement problem. The tutorial wasn’t written for your eye shape.
Deep set eyes have more built-in shadow than most other eye shapes. The socket sits further back, the brow bone protrudes forward, and by the time you open your eyes after applying shadow in the natural crease, a significant portion of that work has vanished. This is why the techniques that look flawless in a tutorial can read as heavy or sunken on you, even when you’ve executed them correctly.
This eyeshadow tutorial for deep set eyes starts from the anatomy of this specific eye shape and builds placement, formula, and technique decisions outward from there. If you’ve ever asked why your eyeshadow disappears when you open your eyes, this is the answer.
What Makes Deep Set Eyes Different (and Why Most Tutorials Get It Wrong)
Deep set eyes sit recessed into the skull, with the orbital bone extending prominently forward. This creates two defining characteristics: there’s usually more visible lid space than in hooded eyes, and there’s already a dramatic natural shadow sitting in the socket before a single product touches the skin.
That existing shadow is where most tutorials go wrong. A standard crease placement tutorial instructs you to blend a medium or dark shade into the natural crease. On a less recessed eye shape, that creates the illusion of depth. On deep set eyes, you already have depth. Adding more to the natural crease amplifies the recession and makes the eye read as smaller and more set-back.
The other common mistake is the smoky eye applied without adjusting for this shape. “Eyeshadow tends to make me look as though I have been punched, and winged liner just disappears into the crease,” one reader noted. That reaction is almost always the result of technique built for a different eye shape. It’s a placement issue, not a product or skill issue.
Deep set vs. hooded, and what to do when you have both:
These two shapes are often confused and sometimes co-occur. Deep set means the eye sits back in the socket with a prominent brow bone and usually a visible crease. Hooded means a fold of skin droops over the crease, reducing visible lid space. If you have both, the tutorials for each shape overlap but diverge on exactly where to place depth. If you’re unsure which you have, our hooded eyes tutorial covers the distinction and the overlap technique in detail.
Two questions to check before step one
Before starting this eyeshadow tutorial for deep set eyes, look straight into a mirror with a neutral expression:
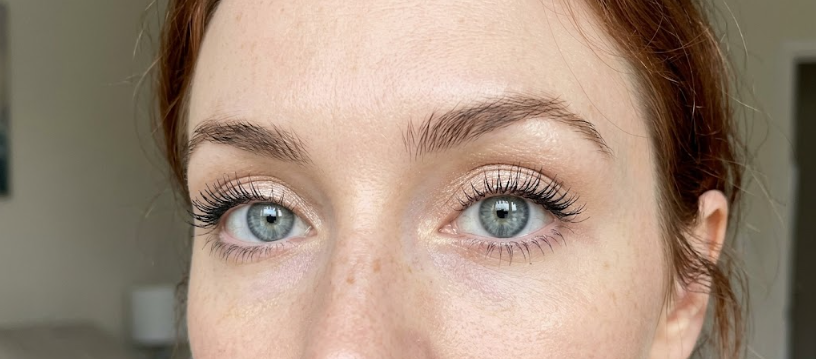
- Can you see a visible eyelid between your lash line and your crease when your eyes are fully open and relaxed?
- Does your brow bone cast a noticeable shadow over your lid?
If yes to both, you’ve got the classic deep set configuration. If yes to the first but not the second, your socket depth is moderate and the techniques here still apply.
The Placement Map for Deep Set Eyes
Understanding where each shade goes is the foundation of any effective eyeshadow tutorial for deep set eyes. The placement rules are different from a standard tutorial, and they don’t flex based on trend or preference.
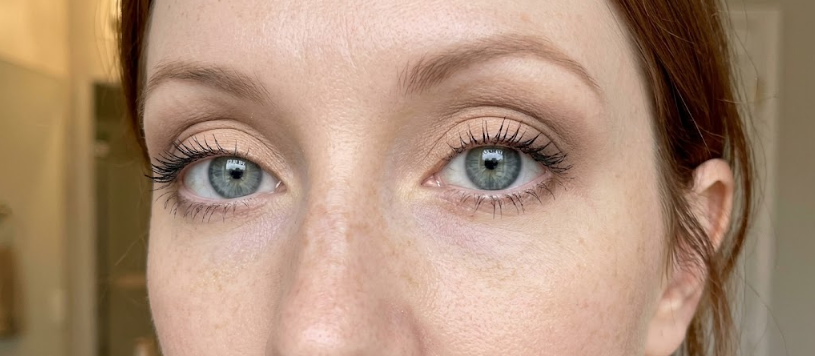
The lid zone is where light lives. A light shade goes on the visible lid from the lash line up to wherever the natural crease begins. Light brings the lid forward optically, countering the recession. On deep set eyes, the instinct to add darkness to the lid is exactly what makes things worse.
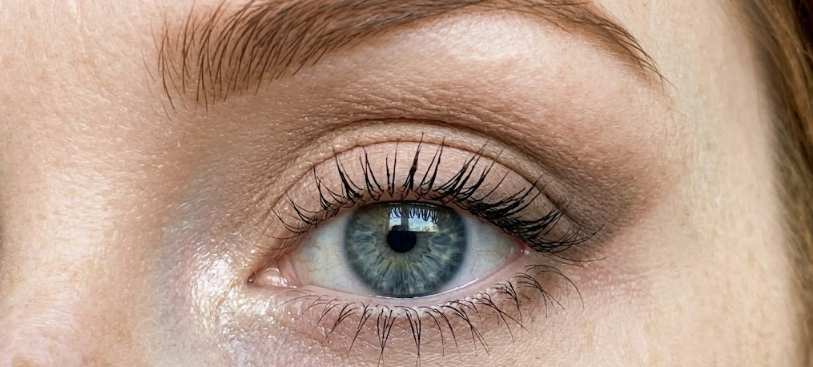
The brow bone transition zone is where depth belongs. Forget the natural crease as a landmark. Find where your brow bone creates a natural shadow, typically an inch or so below the brow itself. That soft, shadowed band of skin is the working crease for this eye shape. A matte transition shade placed there reads as intentional structure rather than recession.
The outer corner is where drama goes when you want it. A deeper matte shade at the outer corner in a V or C shape adds definition without pulling the eye backward. Keep it to the outer third only and lift the blending direction upward, not inward or downward.
The inner corner is a brightening zone. A light champagne, cream, or soft white shimmer pressed lightly into the inner corner opens the eye horizontally and draws attention forward.
What to skip: heavy shadow along the entire lower lash line. “Avoid applying too much dark shadow to the lower lash line, as this can make deep set eyes appear more recessed.” A soft, minimal application along the outer half is fine, kept to a medium tone at most.
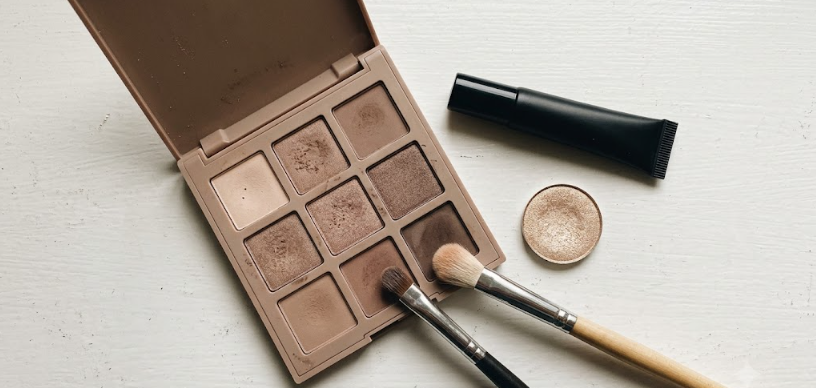
Best Products and Formulas for Deep Set Eyes
Before any product recommendation, formula type matters more than shade or brand. This is one of the most important deep set eye makeup tips you’ll apply: formula governs how long your technique actually lasts.
Deep set eyes create socket compression. When you blink, the lid presses back into the orbital pocket. Any formula with slip, high oil content, or loose-particle texture will migrate under that pressure and pool in the socket, deepening it further.
- Pressed matte eyeshadows are the reliable formula for this eye shape. They don’t migrate. The low oil content keeps them where you place them, and the matte finish doesn’t reflect light from inside the socket.
- Shimmer formulas work with one condition: press, don’t sweep. A shimmer pressed onto the lid with a flat brush over a matte base will stay put. The matte layer underneath acts as a grip surface. Shimmer swept on with a fluffy brush, or applied directly to bare skin, won’t hold through the day. This isn’t a shimmer ban. It’s a method adjustment.
- Eyeshadow primer is non-negotiable here. One of the most practical deep set eye makeup tips is also the most skipped one: prime the full lid before any shadow. “I had all but given up wearing eye makeup. I’m 60 and my crepey eyelids…eyeshadows all made my creases look worse and what was left wore off.” That outcome is almost always a no-primer problem combined with a formula mismatch. A thin layer of eyeshadow primer from lash line to brow bone changes the grip and staying power of everything that follows.
I’ve tested quite a few primers for this eye shape and keep coming back to a few that genuinely hold up through socket compression. Here’s what’s worth your money:

- BEST EYESHADOW PRIMER: Smooth nude eyelid base primer that prevents creasing, dryness & cracking. Enhances vibrant, long-lasting color for...
- BENEFITS: Vegan primer with polymer tech smooths imperfections, perfect as eyeliner or eyeshadow base. Ideal for oily lids & crepey skin, ensures...
Last update on 2026-07-13 / Affiliate links / Images from Amazon Product Advertising API
(As an Amazon Associate, we earn from qualifying purchases.)
This primer holds pressed and shimmer formulas in place through heat and socket compression. It’s been wear-tested across fair to deep skin tones with consistent results and it’s the starting point for every look in this eyeshadow tutorial for deep set eyes.
If you’re looking for the best eyeshadow for deep set eyes at a drugstore price, a pressed matte palette with the neutral-to-warm range this technique needs is the place to start:
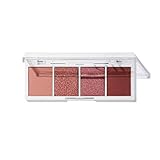
- Perfect pigment: this ultra-pigmented 4-pan shadow palette contains creamy and blendable powder formulas in a mix of matte and shimmer shades to...
- How to wear: Use a primer to prep your eyelids for application. Mix and match colors and apply to eyelid using your favorite eyeshadow brush...
Last update on 2026-07-13 / Affiliate links / Images from Amazon Product Advertising API
(As an Amazon Associate, we earn from qualifying purchases.)
The shades layer without patchiness, which matters when you’re building from a light lid base to a deeper outer corner in the same look. Tested at 6-plus hours wear with no migration observed on medium and deep skin tones.
For center-lid shimmer that stays when pressed over a matte base:

- BETTER THAN EVER : Revlon’s powder eyeshadow palette has a new look and feel and now up to 24-hour wear
- TRANSITIONAL DAY-TO-NIGHT SHADES : Full-pigment shades build and blend for day to night, subtle-to-dramatic looks
Last update on 2026-07-13 / Affiliate links / Images from Amazon Product Advertising API
(As an Amazon Associate, we earn from qualifying purchases.)
For a pressed shimmer that stays on the lid without migrating into the socket, this Revlon Eyeshadow Palette delivers a warm gold payoff.
A note on shade range: The light-to-medium transition zone shades, specifically taupe and warm brown, have been tested on fair to tan skin. If you have deep or very deep skin, a medium-deep warm brown or reddish-brown performs better in the brow bone transition zone than a taupe, which can read gray and ashy on deeper skin tones. If that’s happening, go one level warmer in undertone before trying a different brand.
Step-by-Step Eyeshadow Tutorial for Deep Set Eyes
This is the core of the eyeshadow tutorial for deep set eyes. Every step includes a placement check with eyes open. Don’t skip those checks. They’re part of the technique, not an optional finishing step.
Step 1: Prime the lid from lash line to brow bone
Apply a thin layer of eyeshadow primer to the entire lid from the lash line up to and including the brow bone skin. Use your ring finger to press and spread evenly. Let it set for 30 seconds before touching any shadow. Skipping this step in an eyeshadow tutorial for deep set eyes is what causes mid-day socket migration.
Step 2: Map the working crease
With eyes fully open and looking straight ahead in the mirror, find the zone where your brow bone casts a natural shadow. It sits higher than your natural crease. This is where depth will live in this look. You can trace it lightly with a clean spoolie or mark it visually before you start blending. “If your natural crease disappears when your eyes are open, placing the darkest eyeshadow in the crease can make the eye look smaller.” This step is the fix for that problem, and it’s the move that separates a generic tutorial from an actual eyeshadow tutorial for deep set eyes.
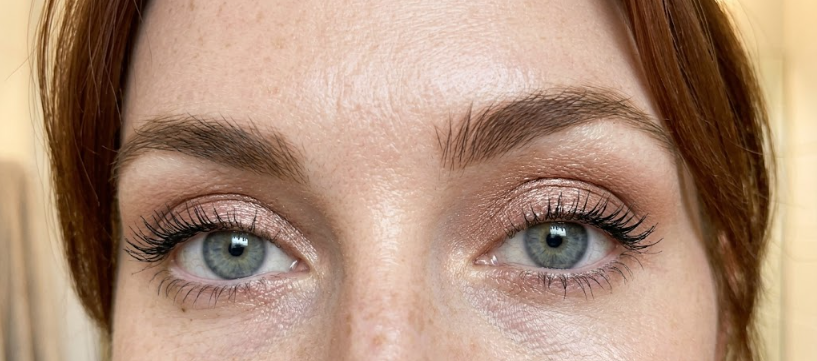
Step 3: Apply a matte transition shade in the mapped crease zone
Using a medium fluffy blending brush, apply a matte transition shade in windshield-wiper strokes in the brow bone shadow zone you identified. A light taupe, warm beige, or soft warm brown all work here. Build it up softly rather than saturating on the first pass. Blend the bottom edge of the shade down toward the natural crease, keeping that lower boundary diffused rather than cut. This is the step most people skip when they try an eyeshadow tutorial for deep set eyes for the first time, and it’s the one that makes everything else land correctly.
Step 4: Place the lid shade with eyes open
With eyes open and looking straight ahead, apply a light matte or pressed shimmer shade to the visible lid from the lash line up to where the transition shade begins. Use a flat brush or your ring fingertip to pack the color rather than sweep it. The visible lid should get distinctly brighter. If it doesn’t, the shade is too dark or the placement is too high. Checking with eyes open at this stage is what this eyeshadow tutorial for deep set eyes is built around.
Step 5: Deepen the outer corner
Load a small pencil brush with a matte shade two to three levels deeper than the transition shade. Apply it to the outer third of the lid and blend upward and outward in a V shape. The darkest concentration sits at the outer corner and softens into the transition shade toward the center. Don’t extend it downward on the lower lash line yet. This outer V is the definition move in any eyeshadow for deep set eyes look, and keeping it lifted is what prevents the eye from reading as pulled down.
Step 6: Brighten the inner corner
With a small flat or tapered brush or your ring fingertip, press a light shimmer into the inner corner of the eye where the upper and lower lash lines meet. Keep it concentrated. It shouldn’t spread significantly onto the lid or the lower lash line. This brightening move is one of the most effective deep set eye makeup tips for making the eye look wider and more forward without changing any other part of the look.
Step 7: Set the brow bone
Take a clean fluffy brush and dust a soft matte shade along the brow bone itself, above the transition shade. Use a color one shade lighter than the transition tone, not a stark white. This lifts the brow bone visually and separates it from the depth zone below. Skip anything with heavy shimmer here. Shimmer on the brow bone of deep set eyes can wash out under the orbital prominence rather than brighten it.
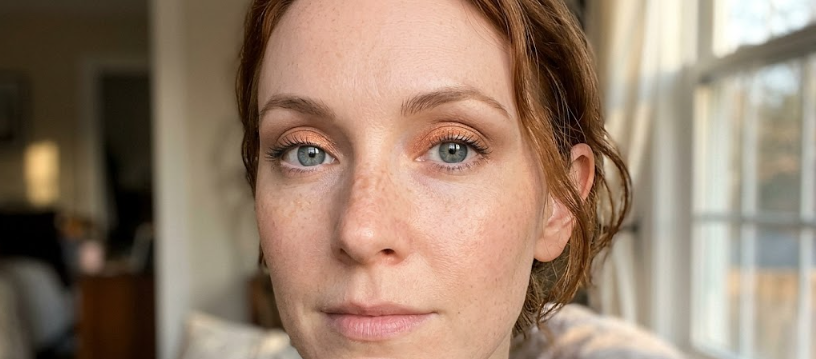
Step 8: Apply mascara and finish the lower lash line
Curl upper lashes before mascara. Apply mascara to the upper lashes, focusing on lift at the center and outer corner rather than heavy coverage at the roots. For the lower lash line, use a light hand. A soft dark shadow diffused along the outer half only keeps the look connected without pulling the eye downward. Skip liner on the waterline entirely if your eyes read as small or compressed.
Step 9: Eyes-open final check
Step back and look straight ahead. Is the shadow in the brow zone visible? Is the lid bright and readable? Is the outer corner lifting the eye rather than pulling it down? If anything reads too heavy, blend upward rather than down. If shadow has migrated into the socket, that’s a formula issue. Wipe and reapply with a pressed matte over primer. Every eyeshadow tutorial for deep set eyes ends here, at the mirror, with eyes open.
Eyeshadow for Deep Set Eyes: Looks for Every Occasion
Everyday office look
The best eyeshadow for deep set eyes in a daytime setting keeps the lid shade matte and uses a lighter hand on the outer V. A warm taupe on the brow bone zone, a nude or ivory matte on the lid, and a soft warm brown at the outer corner reads as polished without going dramatic. Skip the inner corner shimmer if you prefer a quieter finish.
Summer glam or event look
Apply a matte base over the entire lid first and let it set. Then press a gold, rose gold, or bronze shimmer onto the center of the lid with a flat brush. Keep the shimmer zone contained to the center lid only, not spreading to the inner corner or into the crease zone. The pressed-over-matte method holds through heat and humidity significantly better than shimmer applied directly to skin.
If you’re over 40 with deep set eyes
Socket depth tends to increase as the orbital fat pad shifts and the brow bone becomes more prominent with age. A few adjustments help: use a cream-based primer rather than a thin liquid, go lighter on any product near the lower lash line, and skip setting powder on the brow bone area if your skin has texture there. The placement map from this eyeshadow tutorial for deep set eyes still applies at every age. The working crease is still higher than the natural crease. See our mature eye makeup tutorial for the full age-adaptive technique.
If you have both deep set and hooded eyes
The two adjustments stack. Placement moves higher because of the deep set, and the shadow needs to be visible above the hood when eyes are open because of the hooding. “When you’re applying eyeshadow on deep set or hooded eyes, you’re always bringing the color way above your natural crease.” Do the placement check from Step 9 at Step 3, Step 5, and at the end rather than only at the finish. See our hooded eyes tutorial for the full overlap technique.
Common Mistakes in Eyeshadow for Deep Set Eyes
Blending into the natural crease. This is the most consistent error in an eyeshadow tutorial for deep set eyes. The natural crease sits in the socket. Adding depth there adds darkness to an area that’s already dark. Placement moves up, not in.
Over-darkening the lower lash line. Heavy lower lash line product drags the eye down and closes the socket further. A soft, minimal lower lash line is more flattering for this eye shape. Keep it to the outer half and a medium tone at most.
Using loose shimmer without a matte base. This is one of the most common reasons eyeshadow for deep set eyes fails by midday. Loose shimmer on bare skin or primer alone migrates under socket compression within a few hours. The fix is a pressed matte layer first, then the shimmer on top.
Applying with eyes closed and checking with eyes closed. Shadow placement that looks balanced on closed lids shifts when the eye opens. “Whenever I’m doing my makeup I always open my eyes and see how it looks that way.” Do the same at every major step in this eyeshadow tutorial for deep set eyes.
Skipping primer. For deep set eyes, the socket compresses the lid repeatedly throughout the day. Primer is the grip layer that prevents migration. Skipping it on this eye shape specifically produces worse results than it would on flatter lid shapes.
Conclusion
Deep set eyes don’t need a different color story. They need a different placement map. The socket does its own work, and the goal in this eyeshadow tutorial for deep set eyes is to redirect that depth rather than add to it. Light on the lid brings it forward. Matte depth in the brow bone zone rather than the natural crease reads as structure. A clean outer V adds definition. Formula choice holds all of it in place through the day.
The eyes-open check at the end is where every question about eyeshadow for deep set eyes gets answered. What shows is what counts.
FAQ
What are deep set eyes?
Deep set eyes sit further back in the eye socket than other eye shapes, with a prominent brow bone that protrudes forward. This creates natural shadow on the lid and gives the appearance of a more defined socket even without makeup.
Can people with deep set eyes wear a smoky eye?
Yes. A smoky eye works well as an eyeshadow for deep set eyes when the depth is placed at the outer corner and blended upward rather than concentrated in the natural crease. Keeping the lid shade lighter balances the drama and keeps the eye from reading as sunken.
Why does my eyeshadow disappear when I open my eyes?
The natural crease on deep set eyes sits in the socket. When you blend shadow into that crease, it disappears behind the orbital bone when the eye opens. The fix in any eyeshadow tutorial for deep set eyes is to move placement higher, into the brow bone shadow zone, so the color stays visible with eyes open.
What’s the difference between deep set and hooded eyes?
Deep set means the eye sits back in the socket with a prominent brow bone. Hooded means a fold of skin droops over the crease, reducing visible lid space. The two can co-occur. Deep set eyes often have more visible lid space than hooded eyes, even though both shapes share some technique overlap in this eyeshadow tutorial for deep set eyes.
What’s the best eyeshadow for deep set eyes?
Pressed matte formulas are the most reliable for this eye shape because they don’t migrate under socket compression. For shimmer, choose a pressed shimmer rather than a loose formula and apply it over a matte base. A good eyeshadow primer underneath everything is the other non-negotiable.
Is shimmer eyeshadow bad for deep set eyes?
No. The application method is what matters. Pressing shimmer onto the lid with a flat brush over a matte base keeps it in place. Sweeping loose shimmer onto bare skin won’t hold through the day.
Quick Poll
Why did you vote that way? Drop your take below.