Quick Answer: Glass Skin Makeup For Summer
- Switch from a heavy cream moisturizer to a gel or lightweight fluid before applying anything; rich emollients create a slip layer that everything above slides on in heat
- Layer water-based and gel-formula products; cream-on-cream stacking in humidity creates a slip plane that no spray can rescue once it starts moving
- Apply highlight only on the literal highest point of your cheekbone, not across the full face; misplaced glow migrates faster in heat and reads as sweat, not shine
- Use setting spray as a layering tool between major application steps, not just as a final finish
- Keep your total layer count at five or under for summer wear; more layers trap more heat and create more surfaces to slide
- Build in a 90-second midday retouch: blot the T-zone, mist with setting spray, and press a fingertip’s worth of highlight back onto the cheekbone

Every summer, the same thing happens. You spend twenty minutes building the dewiest, most luminous base you’ve ever applied. You catch yourself in the bathroom mirror right before you leave and think it actually worked this time. Then you step outside.
By 11am, the glow has migrated south. The highlight that was sitting perfectly on your cheekbone is now somewhere near your chin. What looked like lit-from-within skin at 8am looks like you’ve been running errands in July. Because you have been.
Glass skin makeup for summer isn’t a product problem. It’s a formula problem. The layering approach that produces a flawless dewy finish indoors was never tested in humidity. The cream-heavy stack that looks incredible on camera creates a slip plane on warm skin, and once that slip plane forms, no setting spray is going to put it back together.
This article fixes the stack. You don’t need different products. You need to understand which formula types work together in heat and which ones work against each other, and then build the look from the bottom up with that knowledge.
What Glass Skin Is and Why Summer Breaks It
Glass skin is a K-beauty-originated look built on the idea that the best makeup looks like exceptional skin rather than coverage. The goal is a dewy, light-reflecting finish with visible luminosity concentrated on the high points of the face. When it works, it reads as healthy, hydrated skin. When glass skin makeup for summer fails, it reads as sweat.
The failure isn’t the trend’s fault. It’s a chemistry mismatch between the way the look is typically built and what warm, humid conditions actually do to stacked product layers.
Most glass skin tutorials call for a hydrating primer, a dewy-finish foundation, a liquid or cream highlighter, and a finishing mist. That’s a reasonable stack in a cool, dry environment. In summer heat, it’s four layers of moisture-attracting product sitting on skin that’s already producing its own moisture. The emollient ingredients that create the dewy finish are the same ingredients that break down under warmth and start to move. Add any cream-on-cream layering and the problem compounds.
The solution isn’t to give up the look. Getting glass skin makeup for summer right means swapping the formula types that create slippage for formula types that grip, and placing the shine exactly where it reads as intentional glow rather than product migration.
A note on skin tone and shade guidance throughout this article: the formula-compatibility principles here apply across all skin tones. Where specific product shade recommendations appear, any gaps in testing across fair, light, medium, tan, deep, and very deep skin are noted directly.
If you want the full breakdown of the classic glass skin routine, we’ve got that covered. The short version: the goal is a dewy, light-reflecting finish with visible luminosity concentrated on the high points of the face.
Build Your Base Right: the Formula Stack That Holds
This is where glass skin makeup for summer either survives or fails. The sequence below is built so that every layer grips the one under it rather than riding on top of it.
Step 1: Prep with a gel moisturizer, not a cream
Start with your usual cleanser and a hydrating toner if that’s part of your routine. The variable that matters most here is your moisturizer. In cooler months, a rich cream moisturizer makes sense. In summer, it becomes the first slip layer in your stack. Switch to a gel or lightweight fluid moisturizer from June through August. Your skin still gets the hydration it needs, but the base you’re building on doesn’t have that heavy emollient slip underneath everything else.
If your skin is on the drier side and a gel moisturizer feels like too much of a pullback, try a gel-cream hybrid and apply it sparingly. A pea-sized amount is enough for most faces. The goal is a slightly tacky surface, not a slick one, for everything that follows.
Step 2: Apply a gel or fluid SPF, not a cream
SPF is non-negotiable in summer, but the formula it comes in matters more than most tutorials mention. A heavy cream SPF applied under a water-based foundation is one of the most reliable ways to create a slip plane before you’ve applied a single drop of makeup. The emollients in the SPF sit on top of skin, the water-based foundation sits on top of that, and by mid-morning the whole thing is moving.
A gel or fluid SPF solves this. It absorbs faster, leaves less of a film, and gives your foundation something to grip. Apply it to the full face and neck, let it absorb for a full two minutes before touching anything else, and you’re building glass skin makeup for summer on a stable surface.
Step 3: Use a water-based primer only
Check the first five ingredients on your primer before you apply it. If a silicone sits in the top three and your foundation is water-based, you’re building chemical incompatibility into your base. Silicone primer under a water-based foundation creates a slip layer that no amount of glass skin setting spray will fully cancel. The two formulas don’t bond.
A water-based primer applied in a thin layer across the T-zone and wherever your makeup tends to break down first will extend wear significantly. A light, even layer is enough; overloading primer creates the flat, dull finish that glass skin makeup for summer specifically isn’t trying to achieve.
Step 4: Apply a satin or natural-finish liquid foundation or skin tint
Full-coverage matte foundation kills the glow entirely. A heavy dewy-finish foundation in summer heat adds moisture on top of moisture and slides. The sweet spot for glass skin makeup for summer is a satin or natural-finish lightweight liquid, or a skin tint if your skin doesn’t need much coverage.
Apply it with a damp sponge or fingertips, working in thin layers from the center of the face outward. Build coverage only where you actually need it. Every layer you add is another surface that can move in heat.
Step 5: Targeted concealer, not full-face
Concealer applied across the full under-eye, forehead, and chin in summer is another opportunity for the stack to slide. Apply it only where the base didn’t do enough. Blend the edges so there’s no visible line where concealer ends and skin tint begins.
Step 6: Press the first layer of setting spray into the base
This is where most people go wrong with glass skin setting spray. They mist it over the finished look and hope. For glass skin makeup for summer that actually holds, the first application of setting spray happens here, before highlight and before blush, and it’s pressed into the skin with a damp sponge immediately after misting while it’s still wet.
Misting and pressing bonds the base layer to your skin before anything goes on top of it. It takes about 15 extra seconds and it’s the single highest-impact move you can make for durability. Your highlight will have a sealed, stable surface to sit on rather than a warm, slightly mobile one.
Setting spray is the structural move that keeps glass skin makeup for summer intact. Here’s what actually delivers on that in humidity.


Last update on 2026-07-13 / Affiliate links / Images from Amazon Product Advertising API
Where to Put the Glow and Where to Leave It Alone
This is the part of glass skin makeup for summer that most tutorials consistently skip. Glow placement isn’t aesthetic preference. It’s the reason the look reads as luminous skin on some people and as product sitting on top of skin on others. It’s also why some glass skin looks survive two hours of summer heat while others don’t make it past the first hour.
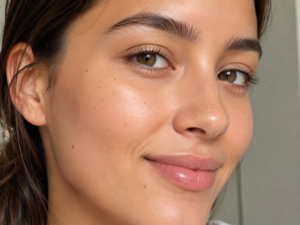
The rule is anatomical. Your highlight needs to sit on the literal highest point of your cheekbone. Not the apple of your cheek. Not the entire cheekbone surface. The single highest point, the spot that catches light when you tilt your face slightly toward a light source. One fingertip, pressed once, blended softly outward from that point only.
Two millimeters off that placement and the glow starts to read as shine rather than structure. In summer, when the face is warmer and product is more mobile, that two-millimeter error compounds over the course of a day. The glow migrates down and the illusion dissolves.
For glass skin makeup for summer specifically, keep your first application of highlight to the cheekbone only. Leave the brow bone and nose bridge out of your morning application. Those two points are available for your midday retouch if the look needs a lift, but stacking highlight across three zones at the start of the day gives you three surfaces that can migrate in heat.
Step 7: Apply cream highlight to the cheekbone only
Take a small amount of cream highlight on your ring finger, less than you think you need. Press it onto the highest point of your cheekbone with a single light press, then feather the edges outward with a clean dry brush. A few outward strokes from the center point and you’re done. If it looks like too little in your bathroom mirror, it’s probably right. Warmth adds natural luminosity to skin. Your highlight is doing less work than it does in winter.
Nano Banana Prompt [Close-up, high-definition, GRWM-style portrait of a woman with very deep skin pressing one fingertip of cream highlight onto the highest point of her cheekbone, the product catching the light precisely on the bone with a concentrated luminous glow, edges softly feathered, natural outdoor light from the side creating visible dimension on her cheekbone structure, no product labels visible]
Cream highlight in a formula that stays put in heat is harder to find than it should be. Here’s what’s worth it at every price point, with shade availability noted across the full tone range.


Last update on 2026-07-13 / Affiliate links / Images from Amazon Product Advertising API

Product Layering for Durability Without Going Matte
The reason glass skin makeup for summer falls apart on most people isn’t that the trend doesn’t work in heat. It’s that the formula stack wasn’t built for heat. Here’s a compatibility check you can run on your existing products before you buy anything new.
Gel on gel holds. Water-based liquid on gel holds. Cream on liquid needs a 30-minute test. Apply your cream product over your liquid base and check back. If the finish is still stable and sitting where you put it, the pairing works for your skin. If it’s already shifting or looking slick, the formula types aren’t compatible for summer layering and the cream product needs a liquid swap.
Cream on cream in summer heat is the combination to avoid. Two cream products stacked on each other trap heat between layers and the warmth separates them over the course of the day. A cream primer under a cream foundation, or a cream foundation under a cream blush and a cream highlight, gives heat too many layers to work through.
The five-layer ceiling matters here. Every layer you add is another surface area that can move. For glass skin makeup for summer, count your layers: moisturizer, SPF, primer, base, highlight. That’s five. Concealer adds one more if you need it. Past six layers in summer, you’re stacking more than the heat can reliably hold.
Keeping your layer count low doesn’t mean compromising the look. It means being precise about what each layer is doing and skipping any layer that isn’t earning its place.
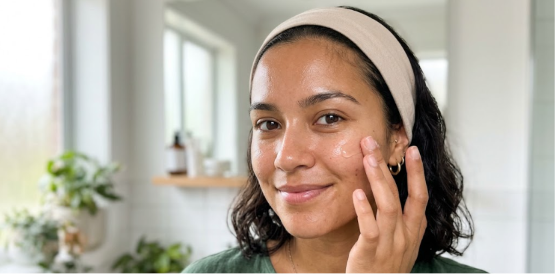
The 2-Minute Midday Glass Skin Fix
Glass skin makeup for summer doesn’t end at the morning application. The midday retouch is part of the technique. Once you know the sequence, it takes about 90 seconds.
Step 8: Blot the T-zone with a blotting paper; lift, don’t press
The T-zone is where oil and sweat collect first. Press a blotting paper flat against your forehead, nose, and chin and lift it straight up. Don’t rub. Don’t press hard. You’re lifting excess oil off the surface. Rubbing disrupts the layers beneath and moves the product you’re trying to preserve.
Step 9: Mist with glass skin setting spray and let it dry naturally
One mist of your setting spray, held about 8 inches from your face, applied in an X and then a T motion. Let it dry naturally. Don’t fan it, don’t blot it, don’t rush it. The 20 seconds it takes to dry is what re-bonds your makeup layers and refreshes the glass skin makeup for summer finish you built that morning.
Step 10: Press the highlight back onto the cheekbone with one fingertip
A tiny amount, smaller than a pea, pressed back onto the highest point of the cheekbone restores the whole look. This is also the moment to add the brow bone and nose bridge shine if you want it, since you’re working on a freshly set surface.
The Drugstore Stack That Actually Delivers Glass Skin Makeup for Summer
Glass skin makeup for summer is achievable at every budget. The formula compatibility principles are identical regardless of price point. Here’s a full drugstore-accessible stack built layer by layer, verified for formula type. Where shade availability across very deep skin tones is limited or untested, that’s noted directly.
Gel moisturizer: Neutrogena Hydro Boost Gel-Cream in a light layer, or CeraVe Moisturizing Lotion in the fluid formula. Both absorb quickly and leave a stable base. No shade dependency.
Fluid SPF: EltaMD UV Clear Broad-Spectrum SPF 46, available at most pharmacies, or La Roche-Posay Anthelios Fluid SPF 60. EltaMD is better-documented for deeper skin tones. La Roche-Posay has less documented coverage at the deepest end of the tone range; note the gap if recommending to very deep skin readers.
Water-based primer: e.l.f. Poreless Putty Primer applies as a gel and sets without silicone dominance at the surface. NYX Angel Veil Skin Perfecting Primer is a solid alternative. Check the first five ingredients before pairing with your foundation to confirm compatibility.
Skin tint or natural-finish base: L’Oréal True Match Hyaluronic Tinted Serum covers the widest shade range and is documented across deeper skin tones. Maybelline Fit Me Luminous and Smooth Foundation in a thin application also works. Covergirl Clean Fresh Skin Milk has gaps in deep shade availability; verify before recommending.
Glass skin setting spray: NYX Fix+ is the most consistently cited affordable option for a dewy-hold finish in humid conditions. Under $10 at most drugstores.
Cream highlight: Wet n Wild MegaGlo Highlighting Powder used with a damp brush, or Milani Hypnotic Lights in the pressed formula applied the same way. Shade availability for very deep skin tones is limited in the Wet n Wild line; the Milani options cover a wider range.
Every product in this stack has been selected for formula-type compatibility first. The look you’re building is glass skin makeup for summer that holds past noon, on a budget that doesn’t require a rethink.


Last update on 2026-07-13 / Affiliate links / Images from Amazon Product Advertising API

Conclusion
Glass skin makeup for summer works in July. It works in humidity. It works on a drugstore budget. The problem was never the trend. It was building the look with formula types that weren’t designed for warmth and then expecting the result to hold.
The fix is in the stack. A gel base instead of a cream base. Water-based layers that grip rather than slide. Highlight placed on bone structure rather than spread across the face. Glass skin setting spray used as a layering tool rather than a finishing step. A two-minute midday retouch built into the day so the look can reset rather than just deteriorate.
When you understand what each formula type is doing, the choices get easier. You stop buying new products hoping one of them finally solves the problem. You solve it once, with what you already own or close to it, and it stays solved.
FAQ
How do you keep glass skin makeup for summer from sliding off?
The most reliable fix is adjusting your formula stack rather than adding more product on top. Swap any cream-formula moisturizer or primer for a gel or water-based version, keep your layer count at five or under, and apply setting spray between the base and the highlight rather than only at the end. Those three changes address the slip plane that causes most glass skin meltdowns in summer heat.
What’s the best glass skin setting spray for humid weather?
For drugstore budgets, NYX Fix+ is the most widely tested option for a dewy hold in humidity. Urban Decay All Nighter works well for a slightly more set finish that still lets the glow show through. Fix+ stays dewier; All Nighter sets slightly more. Both hold in summer conditions when used correctly as a layering tool rather than just a finishing step.
Can you do glass skin makeup for summer if you have oily skin?
Yes, with adjustments to the stack. Oily skin in summer means your base is working against extra natural moisture, so formula compatibility matters even more. A water-based primer with a matte-finish component on the T-zone, a satin-finish foundation rather than a dewy one, and cream highlight concentrated only on the cheekbone will give you the glow without the slide. The shine should come from highlight placement, not from the foundation finish.
How do you touch up glass skin makeup midday without ruining it?
The sequence matters: blotting paper first to lift the T-zone oil, then a mist of glass skin setting spray left to dry naturally, then a small amount of cream highlight pressed back onto the cheekbone. Do it in that order and you’re refreshing the look without disrupting the layers beneath. Skipping the blot and going straight to highlight pushes product into an already-oily surface and creates a patchy result.
Does glass skin makeup for summer work on deeper skin tones?
The technique works across all skin tones. The gap to flag is in specific product shade availability. Some drugstore cream highlights and skin tints have limited deep and very deep shade options, and highlight shades read differently across the melanin range. Gold and bronze-toned highlights tend to perform better on deeper skin tones than silver or champagne shades. Where specific product shade testing across the full tone range hasn’t been completed, that’s noted in the product sections above.
Hot Take: Glass skin in Summer Heat
Why did you vote that way? Drop your take below.