This Day of the Dead makeup tutorial paints a skull face in 12 steps, starting with a white base and finishing with red cheek flowers. Each step has a photo, so you can compare your face to the picture before you move on.
You don’t need special skills for this Day of the Dead makeup tutorial. A steady hand and a well-lit mirror will carry you through. Plan on 1 to 2 hours the first time.
Disclosure: As an Amazon Associate I earn from qualifying purchases. If you buy through a link marked (paid link), I may earn a commission at no extra cost to you.
Quick Answer
- What it is: A Day of the Dead makeup tutorial paints a skull face with black outlines and red accents over a white base.
- How long it takes: Set aside 1 to 2 hours for a first try.
- Skill level: Beginner friendly, because each step adds one shape at a time.
- Safety first: Use makeup made for skin, check the label for “not for use near the eyes,” and patch test on your arm for a couple of days.
- Respect note: Día de Muertos is a Mexican holiday on November 1 and 2, so learn the meaning before you paint.
What Day of the Dead Makeup Means
Día de Muertos is celebrated in Mexico on November 1 and 2. Families remember loved ones who have died with altars, marigolds, candles and favorite foods. The holiday blends Indigenous traditions with Catholic All Saints’ Day and All Souls’ Day, and it is a celebration of memory more than a scary event.
The painted skull look many people copy comes from La Catrina. Illustrator José Guadalupe Posada created her around 1910 as a skeleton in a fancy European hat, poking fun at upper-class Mexicans who copied European fashion. Diego Rivera painted her into a famous mural in 1947, and she became linked with the holiday through sugar skulls and elegant dress.
That history matters when you pick how to wear this look. Anyone can learn a Day of the Dead makeup tutorial, but the meaning behind it belongs to the people who celebrate it.
How to Wear This Look With Respect
Mexico News Daily ran a column by a Mexican writer who believes “anyone, be it Mexican or foreign, can paint their faces as a skull.” The same column asks people not to wear skull paint to churches or cemeteries during the holiday, and not to treat the look as a passing trend.
Other voices say a Halloween party is the wrong place for this face at all. Opinion is split on this, and we cover that debate in the poll at the end. A few habits help either way:
- Learn what the holiday means before you paint.
- Call the look Día de Muertos or Catrina makeup, not a costume.
- Skip the spiderweb in Step 7 if you’re honoring the holiday. Spiderwebs are a Halloween motif, not a Día de Muertos one.
- Share where the look comes from when someone asks about it.
Is This Day of the Dead Makeup Tutorial Safe for Your Skin?
Face paint counts as a cosmetic, and the FDA says every color additive in face paint must be approved for its intended use. A color that’s fine on most skin may not be approved near the eyes, so a red that works on your cheek might not belong on your eyelid.
Here’s the short checklist we follow in this Day of the Dead makeup tutorial:
- Read the label. If a product says “not for use near the eyes,” believe it, even if the box shows a model wearing it there.
- Skip fluorescent colors around the eyes. The FDA doesn’t allow them in that area.
- Patch test first. Put a small dab on your arm for a couple of days before the big night.
- Follow the removal directions. Take it off gently, because the skin around your eyes is thin.
A Note on Skin Tones
The photos in this Day of the Dead makeup tutorial show one light skin tone, and we haven’t wear-tested these steps or products on deep or very deep skin yet. A white cream base is opaque, so it should cover any skin tone, but red and gray shading can read differently over fair, light, medium, tan, deep or very deep skin. Swatch your colors on your own face a few days ahead so there are no surprises.
What You Need for This Day of the Dead Makeup Tutorial
Every item below does one job in the steps. If you own something close, use it.
- Moisturizer and a face wipe or cleanser: a clean base helps cream paint stay put.
- White cream face paint: the most important item, because every other color sits on top of it. Choose one with a face-safe, cosmetic-grade label, and know that thin layers go on smoother than thick ones.
- Sponge for pressing on the white base: foundation sponge duo is described as a latex-free foundation sponge that bounces cream and liquid product into skin, which suits pressing on a cream base. A sponge soaks up some paint, so a two-pack helps. (paid link)
- Buffing brush for the white base: large 1.6 inch kabuki brush suits the face and neck, and smaller 1.2 inch kabuki brush gives you more control near the hairline. You only need one. (paid link)
- Eye brushes for the red fill, smoky blend and small details: 6-piece eye brush set lists eyeshadow, blending, pencil and liner brushes. The listing doesn’t mention an angled brush, so keep one handy for the thin outlines. (paid link)
- Setting powder and a fluffy brush: translucent powder locks the white base so the black lines stay crisp.
- Black liquid or gel eyeliner: a fine tip draws the sockets, nose and teeth.
- Red cream color: a red cream eyeshadow labeled safe for the eye area fills the sockets.
- Gray eyeshadow and a fluffy blending brush: for soft shading.
- Face gems and skin-safe adhesive: don’t use craft glue on your skin.
- Setting spray and a cleansing balm: one holds the finished look, the other removes it later.
Already have a palette with red, black and white? Our guide to eyeshadow palettes can help you plan what to add, and our Halloween makeup kits roundup covers ready-made options.
Day of the Dead Makeup Tutorial: 12 Steps
Step 1: Start With a Clean, Moisturized Face
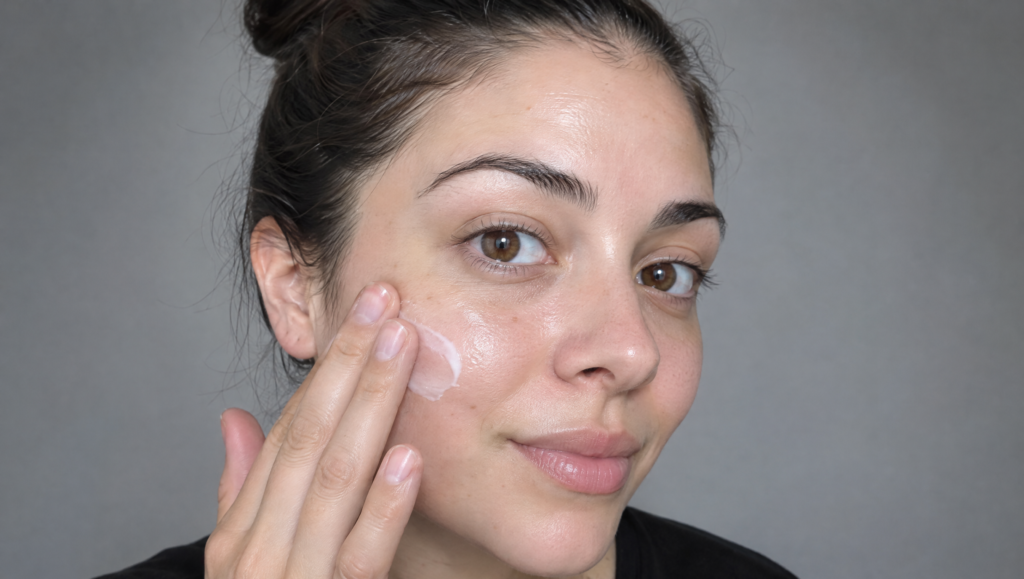
Wash and pat dry. Pin your hair back so nothing touches wet paint. Pat on a thin layer of moisturizer and give it five minutes to sink in. If your skin runs oily, use less, because cream paint can slide on a slick surface.
Step 2: Press On the White Base
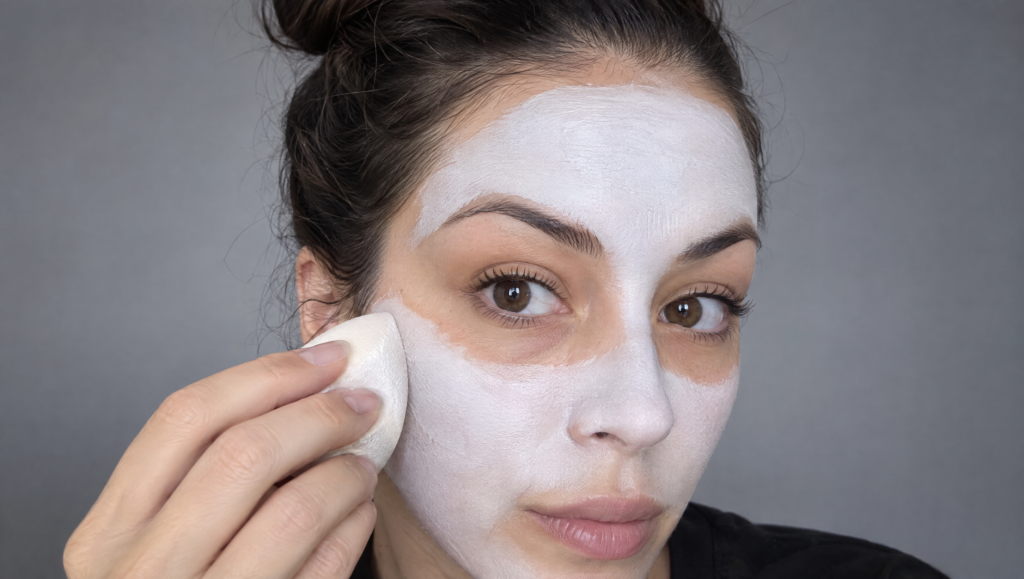
Dab with a damp sponge. Press the white paint across your forehead, cheeks, nose and chin. Cover your eyelids up to the brow bone too. If you prefer a brush, buff the paint in with a kabuki brush instead. Two thin layers cover better than one thick one, and thick paint can crack when you smile.
Step 3: Set the White Base With Powder
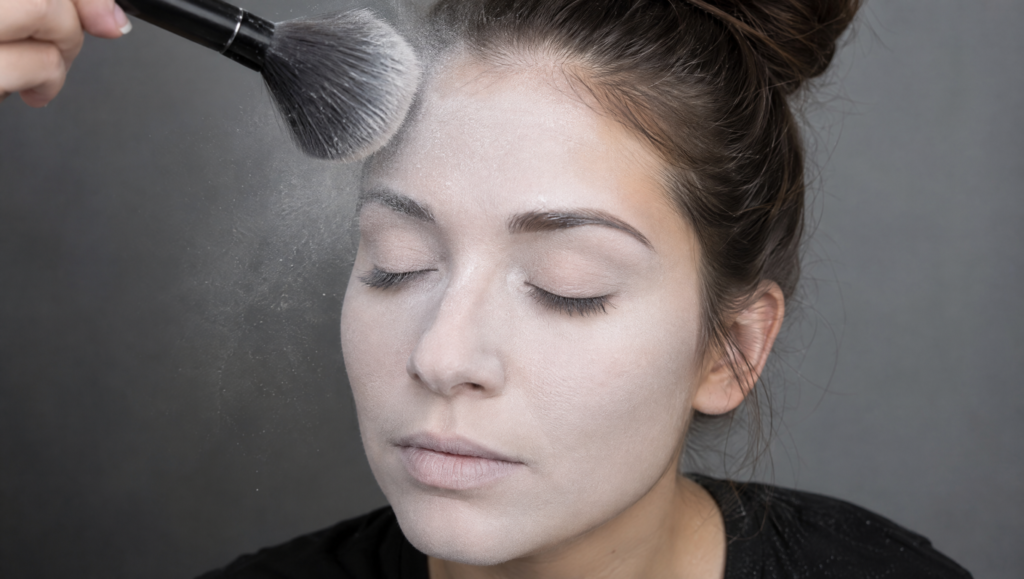
Press and roll the powder on. Load a big fluffy brush and sweep powder over the whole face with your eyes closed. This step matters in every Day of the Dead makeup tutorial, because a set base keeps black liner from smearing into the white.
Step 4: Outline the Eye Sockets
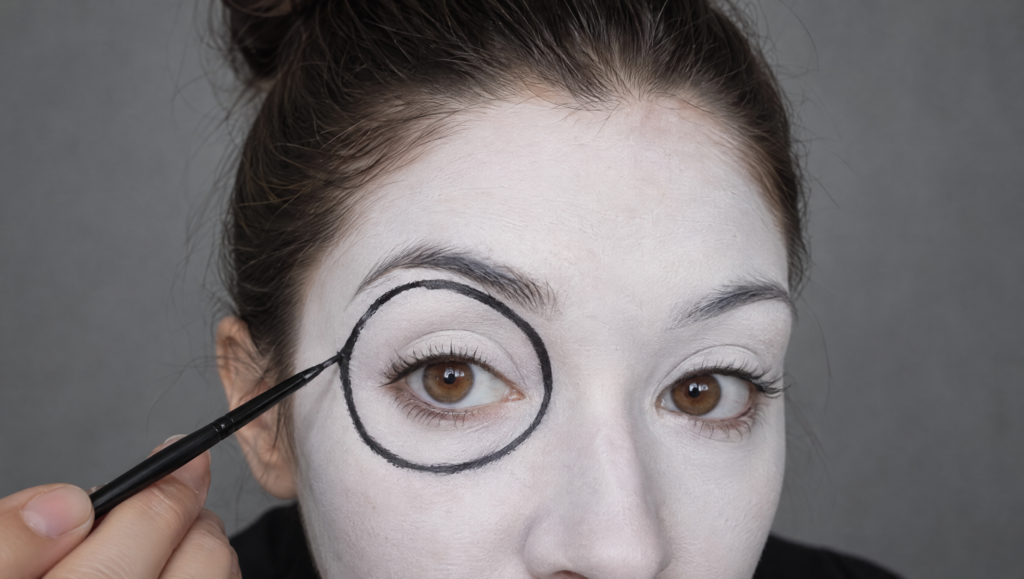
Draw one big round shape per eye. Start on one side and trace a circle that frames your brow bone and your upper cheek. Then match the other side. Step back from the mirror after each eye and check that both circles sit at the same height.
Step 5: Fill the Sockets With Red
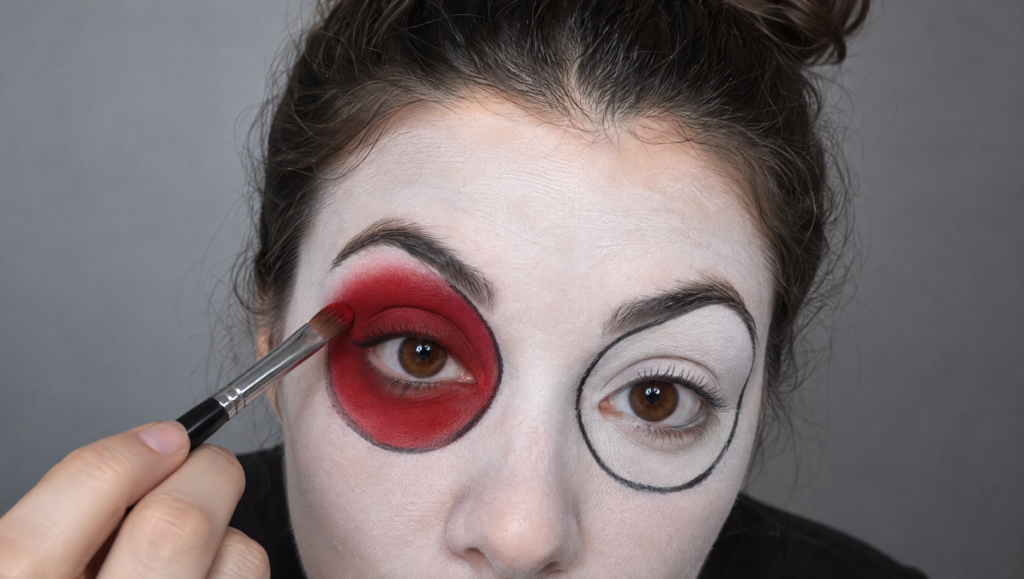
Press the red inside the lines. Use a small flat brush and pat the color on instead of sweeping. Soften the edge with a clean fingertip. A cotton swab dipped in cleanser can tidy a wobbly line without smearing the white.
Step 6: Paint the Nose
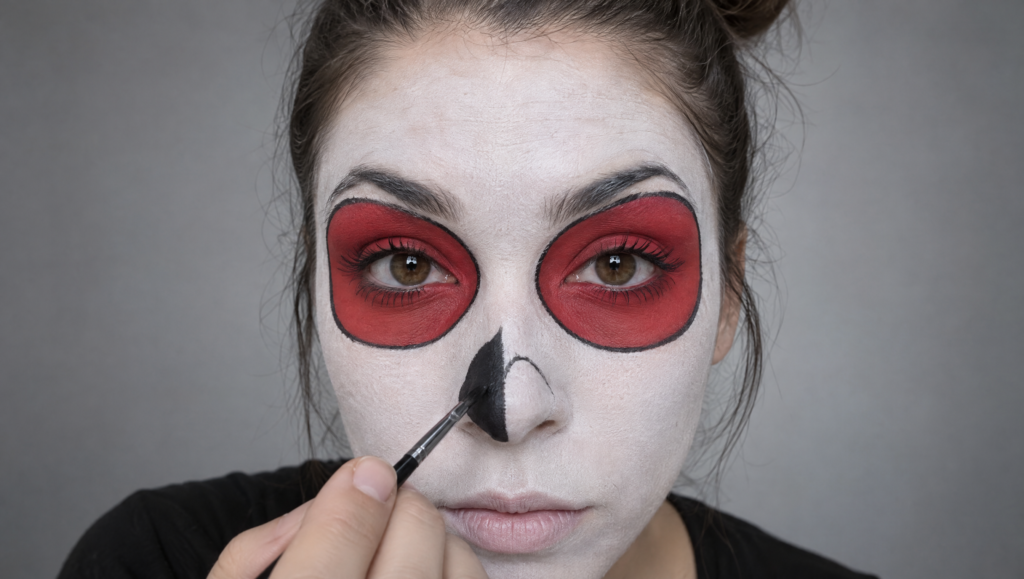
Draw an upside-down heart. Start at the tip of your nose and fill the shape with black. A real skull has an open nose, and this shape gives that same look on a flat face.
Step 7: Draw the Forehead Web (Optional Halloween Touch)
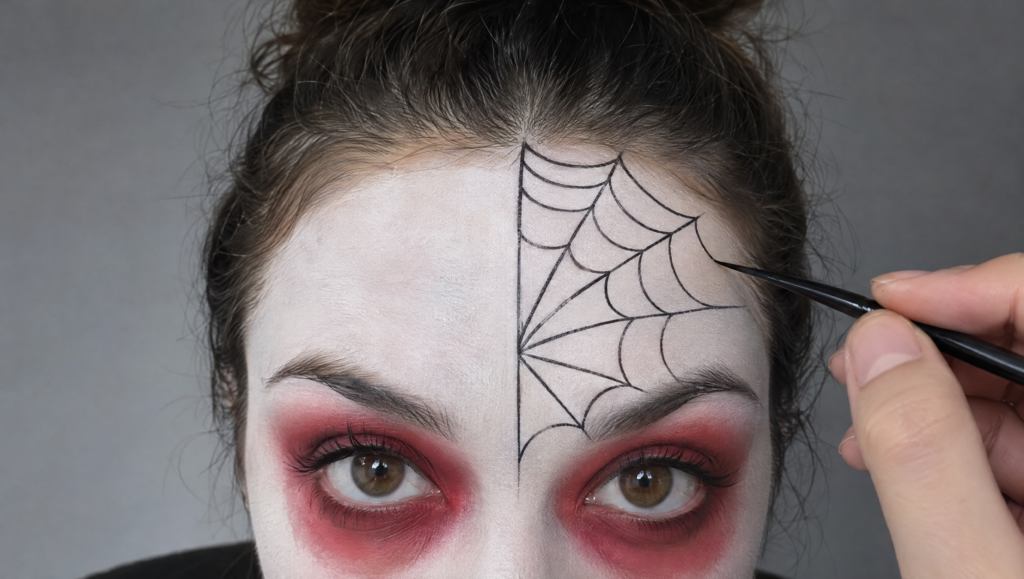
Pick your forehead design. A spiderweb is a Halloween idea, so it belongs in a party look. For a holiday tribute, draw petals or small flowers on the forehead in the same black liner. For the web, draw lines that fan out from one point and join them with curved arcs.
Step 8: Shade With Gray
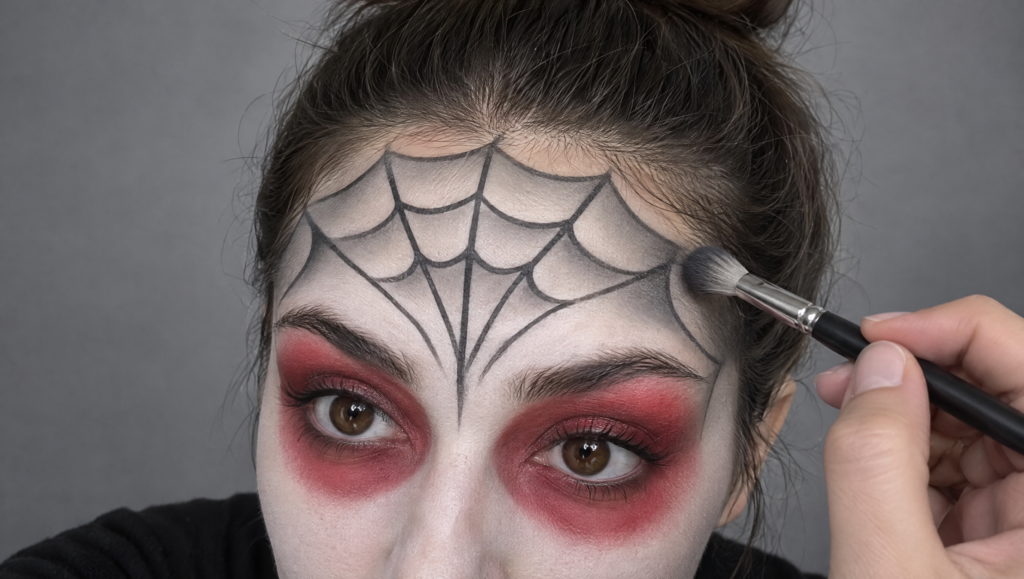
Blend with a light hand. Tap gray shadow along your forehead design and at the temples with a fluffy brush. The soft shading gives the white face some depth, and it takes only a few passes.
Step 9: Add the Crystals
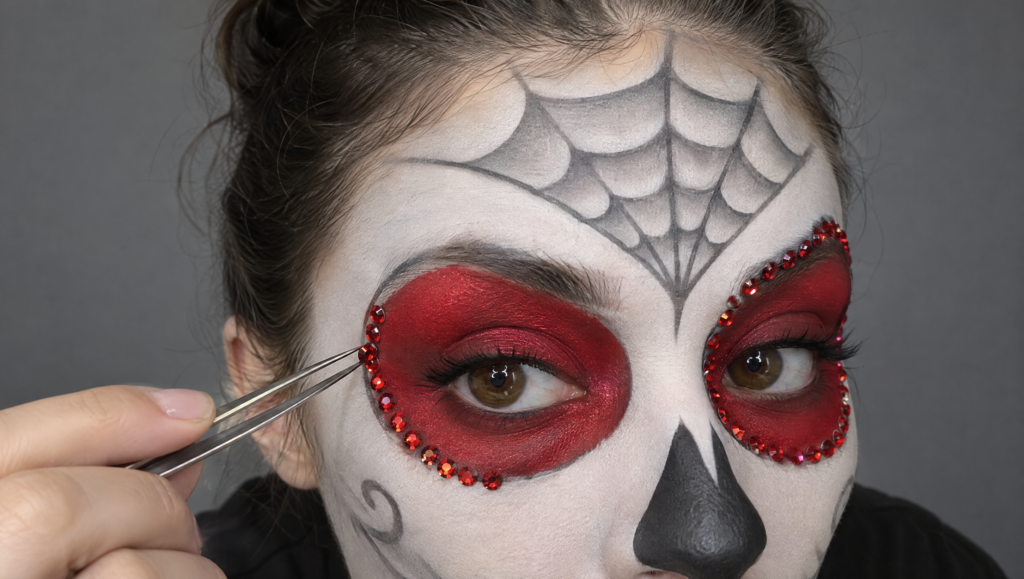
Place gems with tweezers. Dab a tiny amount of cosmetic adhesive on the back of each gem, then press it along the edge of the red socket. Keep the gems on the bone and away from your lash line, so nothing drifts toward your eye.
Step 10: Paint the Teeth and Jaw Lines
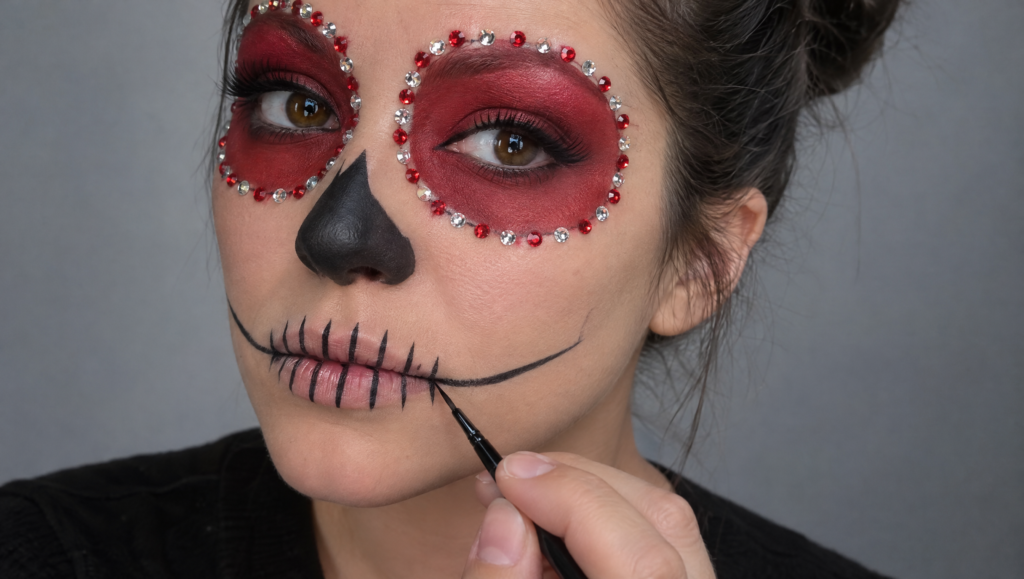
Relax your mouth first. Part your lips a little, then draw short vertical lines across them. Extend two curved lines out along your jaw on each side to make the skull’s jawbone.
Step 11: Paint the Cheek Flowers
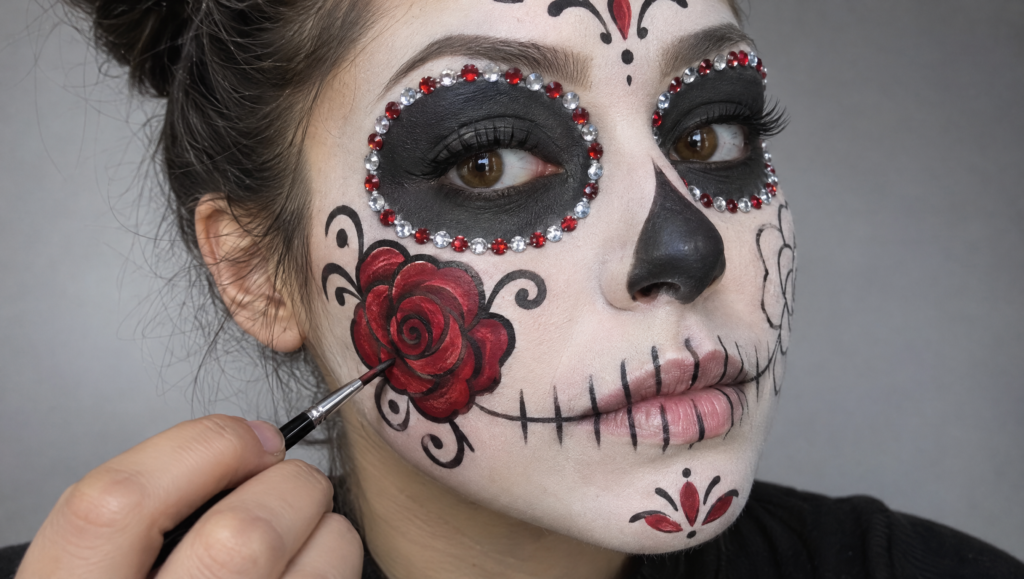
Swirl petals outward from a center dot. Paint the red petals, then outline them in black. Flowers are a common Día de Muertos motif, and marigolds are the best known. Red keeps this one in the same color range as the rest of your face.
Step 12: Set the Look and Take a Final Look
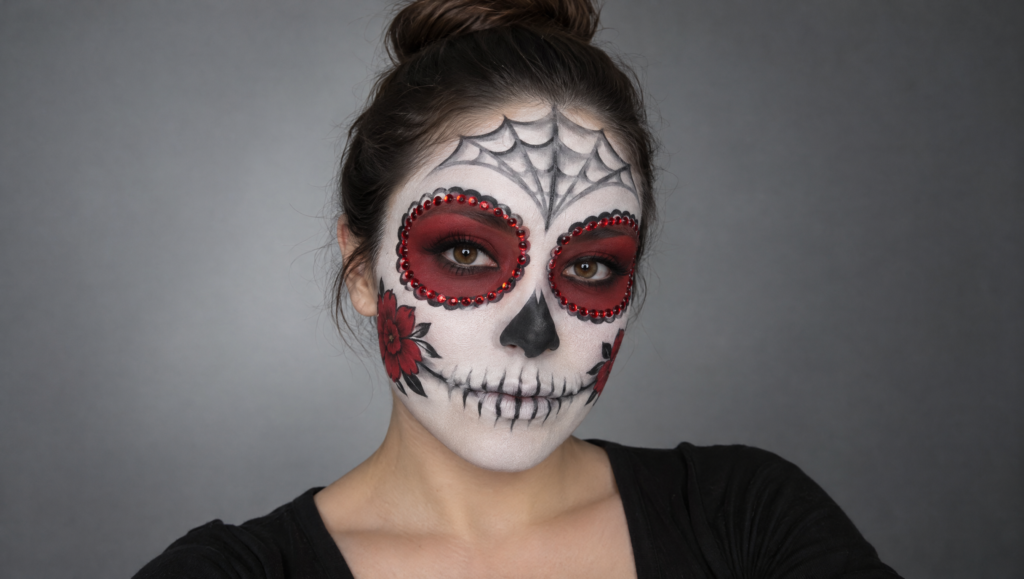
Mist with setting spray at arm’s length. Hold the bottle about a foot away and close your eyes. Add lashes now if you wear them. Check your face straight on in good light, then take a photo to see how the look reads on camera.
To remove the paint later, follow the product’s directions. A cleansing balm works well for cream paint, and you should go slowly around the eyes.
Make This Day of the Dead Makeup Tutorial Last All Night
- Keep powder nearby. A quick press of powder tames shine on your forehead.
- Don’t touch your cheeks. The flowers smudge easily, so skip the hand resting on your face.
- Carry a cotton swab. A tiny cleanup can save a line without redoing the whole eye.
- Drink through a straw. It protects the teeth lines on your lips.
Final Thoughts on This Day of the Dead Makeup Tutorial
A good Day of the Dead makeup tutorial gives you a clear shape to follow, and the 12 steps above cover the full face. Take your time with the thin layers in Steps 2 and 3, because they make the black lines crisp.
Once you know the meaning behind the look, you can decide how and where to wear it.
Day of the Dead Makeup Tutorial FAQs
What is the best base for a Day of the Dead makeup tutorial?
A white cream face paint works best, because it covers evenly and takes powder well. Choose a product made for skin, and read the label for any warning about the eye area.
How long does a Day of the Dead makeup tutorial take?
Plan on 1 to 2 hours for a first try. After you’ve practiced, the same 12 steps go faster.
Which brushes do I need for a Day of the Dead makeup tutorial?
A fluffy powder brush, a small flat brush for the red sockets and a fine detail brush for lines cover every step. A damp sponge handles the white base.
Is it safe to use eyeliner and eyeshadow near the eyes in this look?
Only use products labeled for the eye area. The FDA says some colors approved for skin aren’t approved near the eyes, and it advises believing a “not for use near the eyes” label.
Is Day of the Dead makeup okay to wear if I’m not Mexican?
Opinions differ, and we share both sides above and in the poll below. If you do wear it, learn what the holiday means and avoid wearing it to churches or cemeteries during the celebration.
Poll: Sugar Skull Makeup at a Halloween Party
Is sugar skull makeup okay at a Halloween party if you do it with care?
- Yes, with care it’s a tribute
- Only on Día de Muertos itself
- Only if invited into the tradition
- No, pick a different look
Cast your vote in the comments with A, B, C or D.
Why did you vote that way? Drop your take below.